QEMU is a type-2 hypervisor that simulates CPU instructions on an external architecture using dynamic translation. It is useful for a variety of tasks, including system administration, cloud computing, and testing and development. When combined with other virtualization technologies such as KVM or Xen, it enables the guest to operate at nearly native speed on the host CPU directly.
This post will show you how to use QEMU to run a popular Linux distribution as a guest operating system inside a Linux host by simulating the full machine, including the CPU, memory, and peripherals.
What is QEMU?
Quick Emulator, or QEMU for short, is a flexible virtualization and emulator program that users can use to simulate several hardware platforms on their host system. It can simulate CPUs from several architectures, including x86, ARM, PowerPC, and SPARC, which makes it appropriate for a variety of use cases, such as system management, testing, and software development.

In order to enable users to execute guest operating systems on their host system, QEMU can imitate complete hardware systems, including CPU, RAM, storage devices, and peripheral devices. In addition to networking choices and integration capabilities like drag-and-drop and copy-paste between the host and guest systems, it supports a number of disk image types.
Why QEMU?
A thorough comparison reveals that there are numerous hypervisors. Nevertheless, a lot are poorly known, have proprietary licences, or are only appropriate in specific situations. A few are outdated and not currently being developed.
On the other hand, QEMU is one of the most popular type-2 hypervisors and is free and open-source. It can, in fact, imitate a wide variety of peripherals and devices, and its licence permits unrestricted use in any setting, including servers.
Because of its extensive feature set, QEMU can be used for uncommon use cases as well. It’s especially beneficial for gaming because there are ways to achieve significantly faster video performance. The fact that it can reroute the VGA display over a VNC session makes it useful for remote use as well. It can be used with the assistance of a graphical frontend or, by default, from the terminal. The difficulty of use is the only major drawback of QEMU. It is intended for experienced users rather than being user-friendly.
Utilising QEMU via Command-Line
Using QEMU from the command-line provides several advantages over employing a graphical frontend. Let’s delve into these benefits and then explore the process of installing Linux Mint 21.1 Cinnamon edition on a QEMU virtual machine within a Linux host environment.
Flexibility: Terminal commands afford users more customization options and fine-grained control over QEMU’s behavior. From specifying hardware configurations to setting up networking, terminal-based interactions offer unparalleled flexibility.
Scriptability: Automation and scripting of QEMU commands are more straightforward in the terminal. Users can create scripts to automate repetitive tasks, streamline workflows, and deploy virtual machines consistently across different environments.
Remote Access: The terminal enables remote access and management of QEMU virtual machines, allowing users to administer their virtualized environments from anywhere with SSH access. This remote management capability enhances flexibility and convenience.
Resource Usage: Terminal-based interactions with QEMU typically consume fewer system resources compared to GUI frontends. This reduced resource usage is particularly advantageous on systems with limited resources, such as older computers or embedded systems. Additionally, running multiple virtual machines simultaneously on a single system is more efficient via the terminal.
Consistency: Terminal commands ensure consistency across different platforms and environments. Regardless of the underlying operating system or system configuration, users can rely on terminal commands to achieve consistent outcomes when working with QEMU.
Now, let’s proceed with installing Linux Mint 21.1 Cinnamon edition on a QEMU virtual machine within a Linux host environment. Before starting the installation process, ensure that you have downloaded the Linux Mint 21.1 Cinnamon ISO image.
Using QEMU’s command-line interface, we’ll create and configure a virtual machine with appropriate hardware specifications, including CPU, memory, storage, and networking settings. We’ll boot the virtual machine from the downloaded ISO image and proceed with the installation process, following standard installation procedures. By leveraging the flexibility, scriptability, and efficiency of QEMU’s command-line interface, users can seamlessly set up and manage virtualized environments tailored to their specific requirements. Whether for development, testing, or system administration tasks, QEMU offers a robust and versatile solution accessible via the terminal.
Choosing Virtual Disk
When it comes to selecting a virtual disk type for use with QEMU, several options are available, each with its own set of characteristics and advantages. Among the common formats supported by QEMU are:
1. Raw disk image: This format represents a bit-for-bit copy of a physical disk or partition. While simple and compatible with many systems, raw disk images lack features like snapshots and compression.
2. QCOW2 (QEMU Copy On Write): QCOW2 is QEMU’s native format and offers several advantages over other formats. It supports features such as snapshots, space efficiency through copy-on-write mechanisms, compression, near-raw performance, multi-threading, error handling, memory usage optimization, and encryption capabilities.
3. VMDK (VMware virtual disk): VMDK is a popular format used by VMware hypervisors. While compatible with QEMU, it may not offer the same level of performance and features as QCOW2.
4. VDI (VirtualBox virtual disk): VDI is the native disk image format used by Oracle VirtualBox. While usable with QEMU, it may lack certain advanced features provided by QCOW2.
5. Physical disk: QEMU also supports direct access to physical disks, allowing virtual machines to interact with physical storage devices. This option is useful for scenarios requiring direct hardware access.
In this example, QCOW2 is chosen for its numerous advantages over other formats. Its support for features like snapshots and copy-on-write mechanisms makes it particularly suitable for scenarios where efficient disk space utilisation and data integrity are important.
Again, QCOW2 offers flexibility in disk allocation, allowing users to create either fixed-size (preallocated) or variable-size (non-preallocated) disks. The latter option dynamically grows as space is utilised, making it convenient for scenarios where the exact disk space requirements are uncertain.
The choice of virtual disk type in QEMU depends on factors such as performance requirements, feature support, and compatibility with other hypervisors. For many use cases, QCOW2 emerges as a versatile and efficient option, offering a balance of features and performance.
To create a variable-size QCOW2 disk of 20GB using qemu-img, execute the following command:
$ qemu-img create -f qcow2 myVirtualDisk.qcow2 20GUpon execution, the command will generate a QCOW2 disk named “myVirtualDisk.qcow2” with a capacity of 20GB. The output confirms the successful creation of the disk:
Formatting 'myVirtualDisk.qcow2', fmt=qcow2 cluster_size=65536 extended_l2=off compression_type=zlib size=21474836480 lazy_refcounts=off refcount_bits=16Following the creation, it’s prudent to verify the disk’s attributes. Use the “file” command to confirm the disk’s format and size:
$ file myVirtualDisk.qcow2
myVirtualDisk.qcow2: QEMU QCOW2 Image (v3), 21474836480 bytes
The output indicates that “myVirtualDisk.qcow2” is a QCOW2 image with a size of 20GB.
Lastly, confirm the disk’s existence and permissions using the “ls” command:
$ ls -l myVirtualDisk.qcow2
-rw-r--r-- 1 francesco francesco 196928 Feb  3 19:31 myVirtualDisk.qcow2
The output displays the disk’s details, including its size and permissions.
In summary, executing the provided commands will create a variable-size QCOW2 disk with the specified capacity and verify its attributes to ensure successful creation.
Using KVM to Emulate a Whole Hardware System
Let’s say we wish to build a virtual computer with the following specs:
- Virtual hard disk “myVirtualDisk.qcow2“, previously created
- Boot from ISO file “linuxmint-21.1-cinnamon-64bit.iso“
- 2 CPUs
- 4 GB RAM
- Network card connected to the host via NAT
- High-resolution video card
- Sound card
- Mouse and keyboard
These conditions are satisfied by the following command:
  qemu-system-x86_64
  -enable-kvm
  -m 4G
  -smp 2
  -hda myVirtualDisk.qcow2
  -boot d
  -cdrom linux mint-21.1-cinnamon-64bit.iso
  -netdev user,id=net0,net=192.168.0.0/24,dhcpstart=192.168.0.9
  -device virtio-net-pci,netdev=net0
  -vga qxl
  -device AC97
Let’s look at the meaning of each option:
-enable-kvm → KVM to boost performance
-m 4G → 4GB RAM
-smp 2 → 2CPUs
-hda myVirtualDisk.qcow2 → our 20GB variable-size disk
-boot d → boots the first virtual CD drive
-cdrom linuxmint-21.1-cinnamon-64bit.iso → Linux Mint ISO
-netdev user,id=net0,net=192.168.0.0/24,dhcpstart=192.168.0.9 → NAT with DHCP
-device virtio-net-pci,netdev=net0 → network card
-vga qxl → powerful graphics card
-device AC97 → sound card
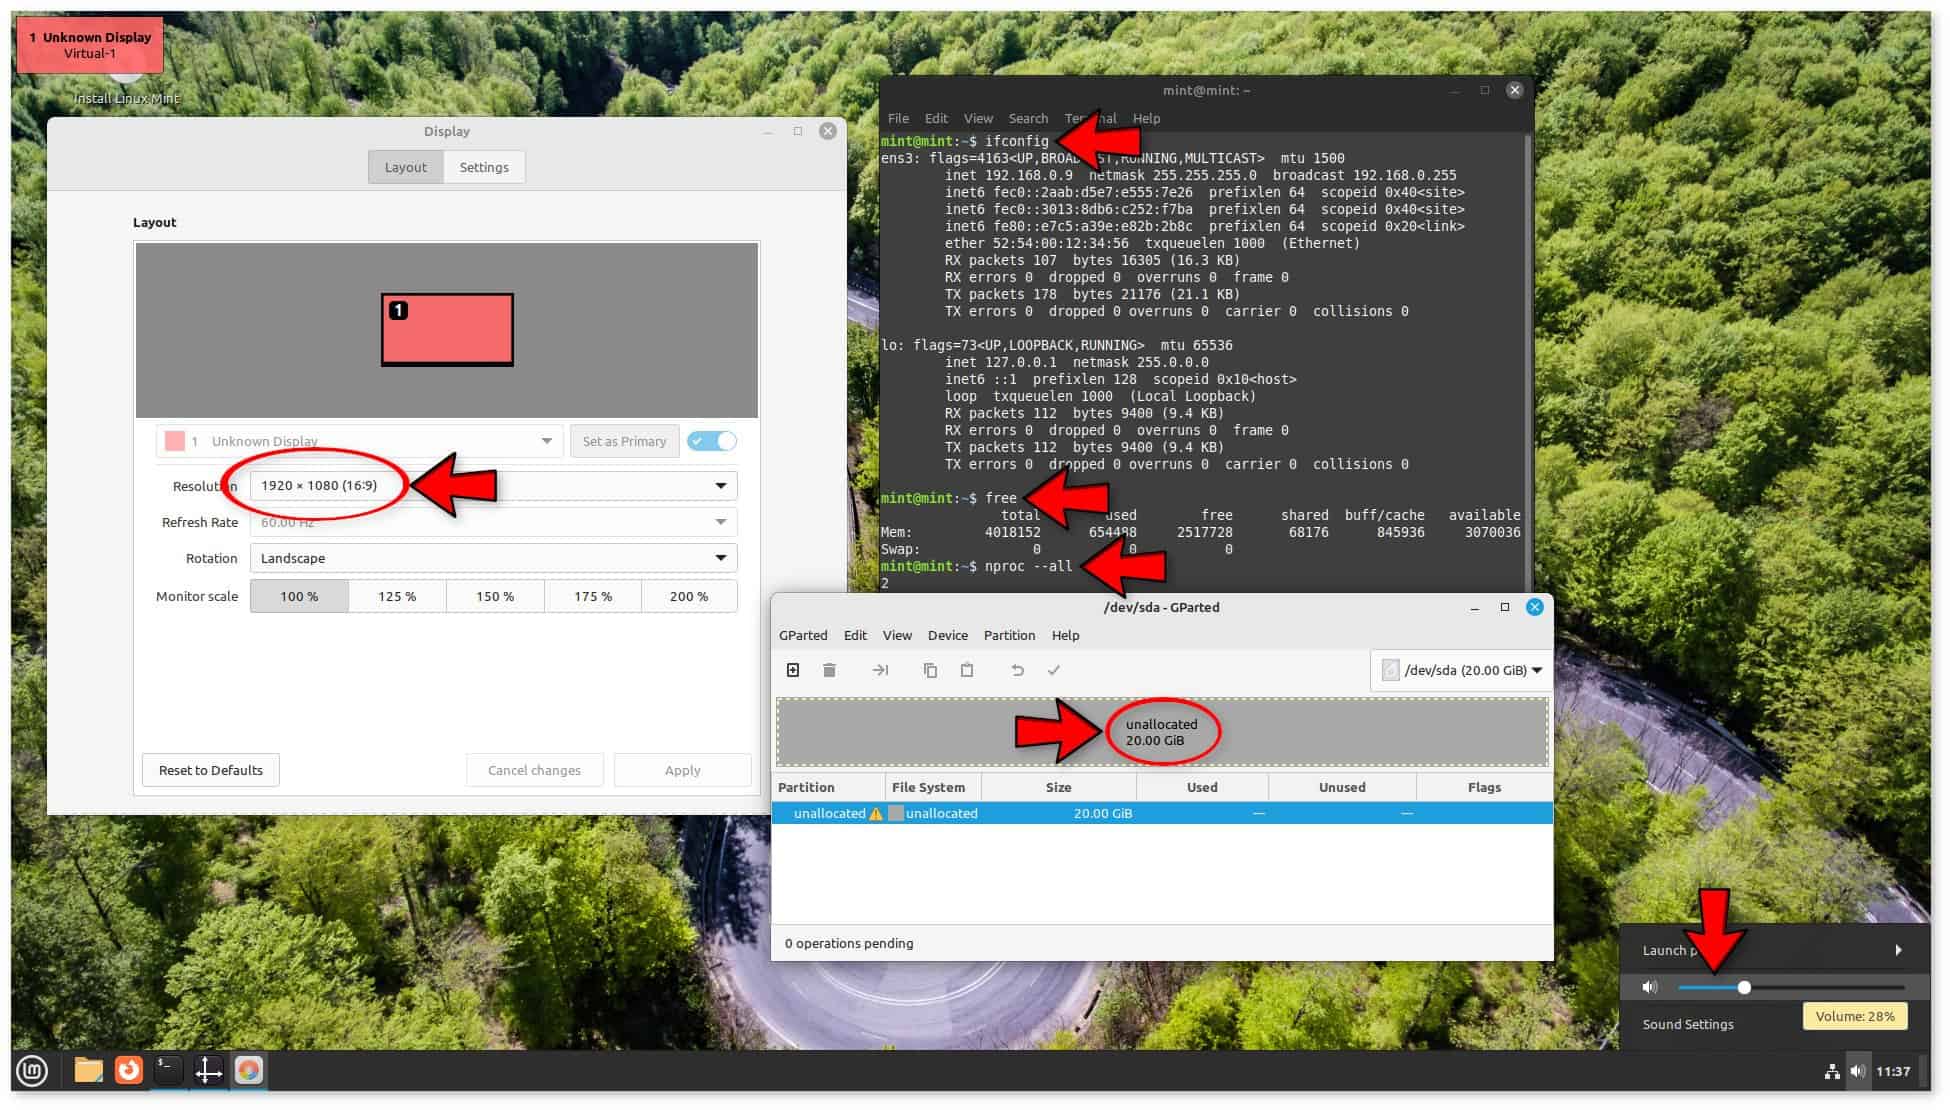
Fast guest booting is accompanied by a negligible host CPU burden (8%, as measured by top, after guest system boot). The standard login sound was audible. We selected the same video resolution as the host using Cinnamon Settings’ Display module, as seen in the screenshot above. Next, we changed the windowed guest view to full screen by pressing CTRL+ALT+F. We saw the 20GB virtual drive that needed to be partitioned using GParted. We used the terminal to verify the number of CPUs with nproc, the quantity of RAM free. The NAT setup was verified with ifconfig. The screenshot shows their outputs, and everything is how it should be.
We have access to more succinct and easily accessible material in addition to the manual, which lists every potential command.
Installation and Configuration of a Guest Operating System
After following the standard installation steps, including automatic partitioning, Linux recognized the QEMU’s virtual hard drive as if it were a SCSI device. Upon completion of the installation process, the initially created “myVirtualDisk.qcow2” file grew in size to 11.2 GiB.

For subsequent starts of the virtual machine, it’s unnecessary to include the “-boot” and “-cdrom” parameters. Alternatively, users can utilise the “-boot menu=on” parameter to specify the device from which the virtual machine should boot.
This seamless integration with the virtual disk ensures smooth operation of the guest operating system within the QEMU environment, allowing users to focus on their tasks without unnecessary complications during startup and operation.
Access to a Host USB Stick via Pass-Through
Through the use of QEMU’s pass-through function, virtual machines can communicate directly with actual hardware, avoiding any overhead or restrictions associated with the virtualization layer. It works well with hardware like storage devices, network adapters, and graphics cards. It can enhance performance and grant access to capabilities unique to a given device that are not available in a completely virtual environment. Pass-through allows you to exchange files with the outside world using a USB flash drive.
lsusb -v
[...]
Bus 001 Device 002: ID 0930:6545 Toshiba Corp. Kingston DataTraveler [...] 4GB Stick
Device Descriptor:
[...]
  idVendor           0x0930 Toshiba Corp.
  idProduct          0x6545 Kingston DataTraveler
[...]
The path to the device file is /dev/bus/usb/XXX/YYY. As per the naming standards of the Linux kernel, the bus number (001 in our case) is represented by XXX and it typically remains constant. YYY, on the other hand, is the device number (002 in our example), which is updated each time the USB device is plugged in and disconnected. Now let’s verify the permissions of the device files:
ls -l /dev/bus/usb/001/002
crw-rw-rw- 1 root root 189, 1 Feb  6 08:35 /dev/bus/usb/001/002
Root is the user and group. Since the group needs to be kvm in order to grant the visitor access to the device, this is bad for QEMU. Now, let’s execute the next two commands with root rights to permanently alter the group linked to this specific device using an udev rule:
echo 'SUBSYSTEM=="usb", ATTR{idVendor}=="0930", ATTR{idProduct}=="6545", OWNER="root", GROUP="kvm", MODE="0666"' > /etc/udev/rules.d/99-usb-stick.rules

# udevadm control --reload-rules && udevadm trigger
Let’s take the USB stick out and put it back in. Rechecking the device file permissions and restarting the host are the next steps to take if the group is still root. Let’s now launch QEMU with the additional three parameters listed below, using the idVendor and idProduct that lsusb had previously supplied:
-device usb-ehci,id=ehci \
-usb \
-device usb-host,bus=ehci.0,vendorid=0x0930,productid=0x6545
\In doing so, we were able to add an EHCI controller (called ehci) and so obtain a USB 2.0 bus (called ehci.0). Consequently, the desktop displays the device icon:

The Guest Operating System Snapshots
With QEMU’s snapshot capability, you can record a virtual machine’s state at a certain point in time and, if you’d like, go back to that state at a later date. This can be helpful in a variety of situations, including software testing, creating new features, and troubleshooting problems.
A QEMU virtual machine in operation can be snapshotted using a number of tools:
- QEMU Monitor
- libvirt project-based tools, like the CLI program virsh and the graphical user interface (GUI) for libvirt, virt-manager.
We would need to install a number of extra packages, adjust the permissions, and—most importantly—use QEMU in a different way via an XML file if we wanted to use virsh. QEMU Monitor doesn’t require any more setting, so let’s utilize it to keep things consistent with what we’ve done so far.
Let’s launch our virtual machine using the extra choice listed below:
-monitor stdioThen, let’s run the following command in the QEMU Monitor to take a snapshot named snapshot1:
(qemu) savevm snapshot2In this manner, the virtual machine in use returns to its state from snapshot 1. The file that was added prior to collecting snapshot 2 actually no longer exists. It is important to remember that snapshots might fill the disk and take up a lot of space. We use info snapshots to view every snapshot:
(qemu) info snapshots
List of snapshots present on all disks:
ID        TAG               VM SIZE                DATE     VM CLOCK     ICOUNT
--        snapshot1        1.66 GiB 2023-02-12 21:10:02 00:07:02.767
--        snapshot2        1.99 GiB 2023-02-12 21:16:14 00:12:54.419
Let’s delete both snapshots:
(qemu) delvm snapshot2
(qemu) delvm snapshot1
(qemu) info snapshots
There is no snapshot available.
Wrapping Up
In conclusion, the exploration of QEMU’s capabilities for virtualization and emulation reveals its versatility and utility across various computing tasks. Through command-line interactions, users can harness QEMU’s flexibility, scriptability, and efficiency to create and manage virtualized environments tailored to their specific requirements. From simulating complete hardware systems to accessing external devices via pass-through, QEMU offers a robust solution for diverse use cases such as system administration, software development, testing, and more. With features like snapshots, users can efficiently manage virtual machine states, enhancing productivity and facilitating tasks like software testing and troubleshooting. Overall, QEMU stands as a powerful and accessible tool in the realm of virtualization and emulation, empowering users to effectively utilise virtual environments for a wide range of purposes.