In this tutorial we will learn how to resize, create and delete drives (partitions) without losing data.
We have all faced this problems before. However large the hard disk is, it ultimately fills up. In my case, I have Windows XP installed in my system, in which I have 10 GB in C drive, 15 GB in E drive, 10 GB in F drive and 5 GB in G drive. For the purpose of this tutorial, I will show you how to resize my C drive to 8 GB, create a new drive of 2 GB, delete my F drive, and increase my G drive to 16 GB.
- Note : Although I have done this in Windows XP, you can do this in Windows 7 and any Linux distro as well. Also, when you move and resize partitions, your data is preserved, but it is lost when you delete it and create a new partition in its place.
To start with, we need a software called Gparted, which is a open source Debian based Linux distro that is used of handling partitions. If you don’t know what a partition is, they roughly resemble drives of your had disk.
First download the .iso file from http://gparted.sourceforge.net. Then burn it to a CD/DVD or a pen drive. Live boot from the removable media and follow these instructions.
Resizing Partitions
First boot up from the removable device. You will see the following screen

Select don’t touch keymap and proceed.
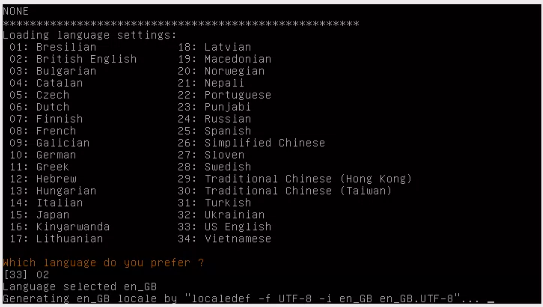
The default options are given within [] brackets. Select your language
Type zero to start X (GUI in Linux).

You will be presented with the following screen. If the Gparted utility doesnt start, click on Gparted icon in the desktop.
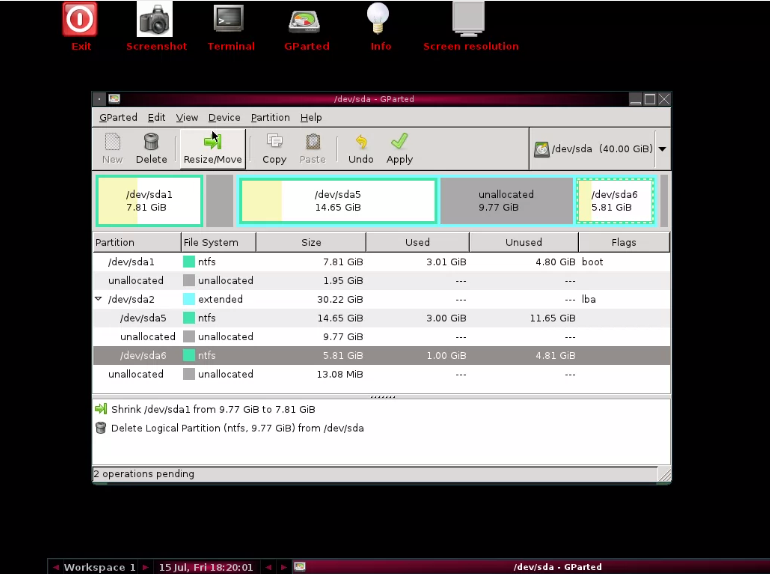
- Note: You will find that you will not see regular drive letters here. This is how drives are represented in Linux. /dev/sda1 represents the first drive, /dev/sda2 the second partition and so on. /dev/sda1 is C in my system. Your PC cant have more than 4 primary partitions in a single hard disk. However, it can have an extended partitions which can have more partition in it.
In my PC, /dev/sda1 represents C drive, /dev/sda5 represents the E drive, /dev/sda6 represents F drive and /dev/sda7 represents G drive.
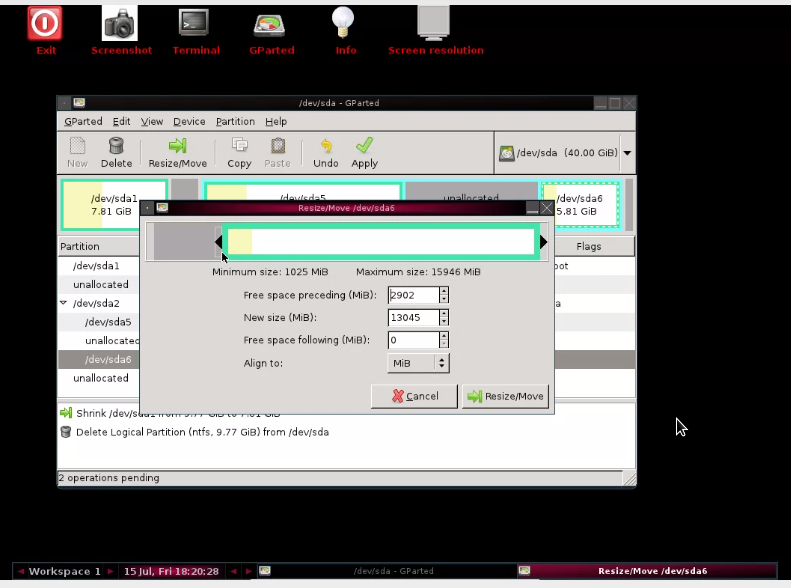
To resize a partition, click on it graphical representation and click on move/resize. You will be presented with the following screen.
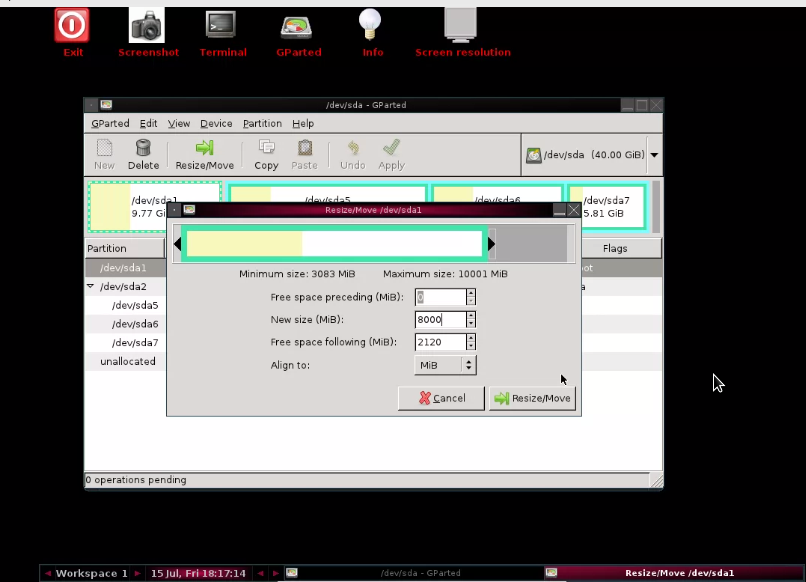
Click on the green border of the graphical image representation of your drive and drag it to your required size. You can also type in the dialog box for a perfect size.
Once done, click on resize/move.
- Note: The yellow portion of the had disk represents the space that is already filled with data. You cant resize it.
The resize will not start immediately. It will be queued, if you have more task, do it and add it to the queue. When finished, click on “Done”.
Deleting Partitions
Deleting partitions is very simple, just click on a partition and click on delete. This task is also queued thus allowing you a chance to review your choice.

Moving Partitions
Now that I have deleted my F drive, some unallocated space remains. To fill it up, I will expand my G drive to fill up the space and move it just after E drive. To do this, first select the partition and click on resize/move. Click on left border of the drive diagram on the dialog that appears and drag it so that it fills up the entire grey (unallocated space). Then click on resize/move.
Note: You can only move drives that are in the same partition. Not to other partition. For example, I cannot drag and move my e drive from the extended partition /dev/sda2 to /dev/sda1.
Creating New Partition
In my /dev/sda1 partition, I have some unallocated space in which i would like to create a new drive. For that, click on grey area and click on new partition. A dialog like this will appear.


Leave this as a primary partition and select unformatted so that you can format it as NTFS later.
Once all the work is done. Click on apply. Note that it may take a long time to complete all your actions.