Inkscape is a great tool to design SVG graphics such as icons, logos and any other vector graphics. It’s a cool little application. If you’re not familiar with Inkscape, you should read this article on NixFAQ. In short, Inkscape is an amazing full fledged vector graphics editor which helps you to create stunning vector graphics with superb performance, features, tools and extensions.
Many of the designers need to export multiple objects at once. It’s called batch export and it is important because manually exporting each object is tiring and time consuming. So almost all editors include batch export option and Inkscape too. On the export option (Keyboard Ctrl+Shift+E), you will see a handy batch export checkbox. This allows you to export in PNG. But Inkscape only allows you to export in PNG and not SVG. So in this tutorial, I will teach you how to export multiple objects into individual SVG files. So let’s start.
But before that, I want to write a few things about cloning, tiled cloning, arranging objects into grids because you need to arrange your objects for several reasons. This is also important for those who are working with icons. Because if you have tons of icons in one document, it’s hard to arrange them manually. So, let’s first start with cloning, tiled cloning and arranging.
Cloning and tiled cloning
Clone tool is used to create clones of original objects. Now you might say, why do we need a clone tool when we have duplicates? Because Clone and Duplicate are not the same thing. Here I have cloned an object. Now, if I edit the original object, the changes will automatically be applied to the clone object.

With duplicate, you have a duplicate object which you will have to modify separately. But with clones, any modification applied to the original will be mirrored to the cloned object. In the picture I created a pie chart with segmentation option in the ellipses tool. When I applied the edit on the original, the clone also mirrored the modification turning into an exact copy of the original object.
Another very useful feature of this tool is Tiled cloning. The Tiled Clone option lets you clone an object multiple times in girds.

This is a handy feature when you need to create multiple clones of an object. Here I cloned an object in a 10×10 grid, so now I have 100 clones. And if I modify the original, all hundreds of the clones will reflect the modification.
Now, you have to unlink clones to make each clone independent from the original. To unlink clones from the original, click and select the original object then simply go to Edit > Clone > Unlink clone. Or you can just press Shift + Alt + D) on your keyboard to unlink faster. After modifying the original, or if you simply want to duplicate, you should always unlink the clone.
Arrange your horribly scattered object beautifully in girds
If you have multiple icons scattered across the document, it will look awful and bad. Manually arranging every icon or object is tiring. Luckily Inkscape has an Arrange tool to arrange multiple objects in girds.

Here, you can see how horribly scattered objects are arranged in a 4×5 grid automatically with the Arrange tool. This is the most important tool for me when I’m designing icons, and my object gets scattered across the document. With Alignment tool, it would take tons of time. But with Arrange, it is better, easy and faster.
To arrange objects in grid, select objects you want to arrange, then go to Objects > Arrange. Select grid rows and columns, then click arrange. You can also set the space between each row and column. If you want to fit the arranged objects into a bounding box, select the option for it. You also can arrange ellipses to polar coordinate with the same tool. Just go to the polar coordinate tab and select sides and press arrange.
Export multiple objects using batch export
If you have multiple objects and you want to export all of them in once, you can do so with batch export.

So I have three objects here which I want to export in a batch. So I can just select the objects, go to File > Export PNG images. Or press Ctrl+Shift+E on your keyboard. Then when the export panel comes up, simply check the box with the label “Batch export X selected objects” where X is the number of objects you have selected.
Export multiple objects as SVG
So you can export multiple objects as PNGs easily, but exporting multiple objects as SVG files is not easy and straightforward. There is no batch export option that allows export objects in SVG. But there are workarounds which I will show in this section. First one is Layers as a separate SVG.
Method one – Layer as separate SVG
To apply this method, first, you have to create layers, and move each object to different layers. You have to make a layer for each object you want to export. When you finish moving objects to different layers, go to File > Save a copy and select “Layer as separate SVG” in the format selection dropdown option.

There are some problems with this method. Page boundary is set the same for every layer. So you have to press Ctrl+Shift+R for every exported SVG to fit objects in its own page boundary. I do not know why Inkscape has not yet added any option for batch SVG export.
This is not a great option. The next method I’m going to discuss is the best and fastest method. You can use this method to export multiple objects without any hassle.
Method two – Inkscape + Figma combo
First, arrange every object nicely so the page gets organized. Then go to File > Save as and select “Plain SVG” as file format. This way, inkscape specific codes will be converted to plain SVG codes and you will have no problem. If you have text on your document, you have to convert all the texts to paths. To do this, select all the objects with texts, then go to Path >
“Object to path”. If you have font-awesome icons on your document, be sure to convert them to path as well.
After converting texts to path and saving the document as Plain SVG, you are ready for batch SVG export.
- First, go to Figma (Its free to use, if it prompts for account, create one)
- From the main interface of Figma, press the “+” (Plus) icon in the corner. If you cannot find the “+” icon, go to Draft or Recent and look at the top right corner.
- Click the plus icon to open a new draft
- Open your system file manager and locate the document you saved previously in Plain SVG
- Simply drag the file and drop onto the opened figma draft
- Select the whole page and right click > Ungroup
- Ungroup until each object separates, do not ungroup too much that your grouped objects get separated.
-
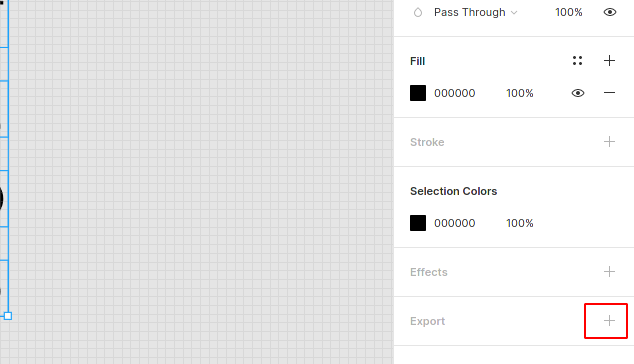
Click and drag the mouse over every object you want to export and from the right panel, click “+” icon on the export option
-
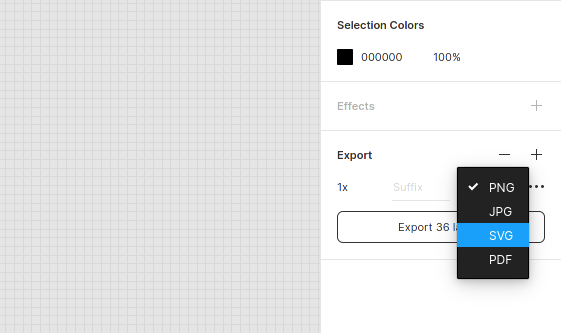
After clicking export, you will have the option for export file formats. Simply choose SVG and hit export layers.
- Each object will be its own SVG inside a zip file which you can unzip and edit with inkscape.


Conclusion
In this tutorial, I have tried to show how to clone, arrange and export in PNG and SVG. I have discussed the best method for batch exporting as SVG which is quite hard in Inkscape. If you are an Inkscape user, do comment if this helped you and if you have any tips to share with us. Thank you so much for reading. Happy new year, and wish you all the best.


