GitHub Actions is the shiny new CI/CD from GitHub. I have had some experience in setting it up in production environment. In this guide I will be talking about the pros, the cons and other tricks to get you upto speed.
There are two main parts of GitHub Actions:
Actions are reusable pieces of code that perform a specific task. We will primarily be looking at Workflows in this article, which is a YAML defined piece of code that defines a pipeline for code or allows you to run any manual script with a trigger. There will be many Actions that will come together to form the Workflow. We are primarily going to use Actions from the Actions Marketplace, but it is possible to build your own with Docker or NodeJS. These will typically be run on GitHub’s own servers, for which they allot you some free minutes per month, beyond which it is chargeable. You will find the pricing on GitHub Actions’ page, but it should be free for most people.
Workflows
Workflow is code that defines a set of Actions or tasks to be performed with a trigger, which may be automatic or manual. To demonstrate how they work, I have created a repository on GitHub and have put in simple Python code that would output “Hello World!” and we would wrap this with GitHub Actions and see if it executes.
The simple Python script looks like this:
#!/usr/bin/env python

print("Test")
We will call this file test.py. Then we will be adding the actual GitHub Workflow script to .github/workflows/run.yml.
name: Deploy

on:
  push:
    branches:
      - master

jobs:
  run:
    name: Run script
    runs-on: ubuntu-18.04
    container:
      image: python:buster

    steps:
    - name: Checkout
      uses: actions/checkout@v2

    - name: Run Python script
      run: python test.py

  test:
    name: Done
    runs-on: ubuntu-18.04

    steps:
    - name: Run done
      run: echo "Done!"
Most of the code should be self-understandable. We will be running our script in the Python 3 Docker container. The workflow script will be pulling code and running the code. As you can see from line 2-4 of the script, this will be run when the master branch pushed into the repo. There are other interesting options on when to deploy including deploying after opening Pull Request, cron, manual deployments etc.

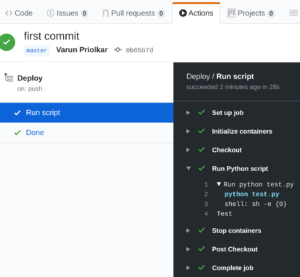
If everything worked as expected you should be getting an output like this on the repository’s Actions section.
Simple Deployments
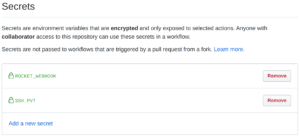
For this experiment, we will be copying the Python file over to a server and posting to Rocket Chat if it is successful to mimic a real deployment. We will be using a couple of pre-made Actions from the Marketplace for this – SCP Files and Rocket Chat Notification. First, we will be defining the Rocket Chat webhook and SSH key needed to secrets section of GitHub repository’s settings.

The code would look like this:
name: Deploy

on:
  push:
    branches:
      - master

jobs:
  run:
    name: Run script
    runs-on: ubuntu-18.04

    steps:
    - name: Checkout
      uses: actions/checkout@v2

    - name: copy file via ssh key
      uses: appleboy/scp-action@master
      env:
        HOST: 145.77.248.235
        USERNAME: root
        PORT: 22
        KEY: ${{ secrets.SSH_PVT }}
      with:
        source: "test.py"
        target: "/test"

    - name: Rocket.Chat Notification
      uses: RocketChat/Rocket.Chat.GitHub.Action.Notification@master
      if: always()
      with:
        type: ${{ job.status }}
        job_name: '*Test Deploy*'
        channel: '#nixfaq'
        mention: 'here'
        mention_if: 'failure'
        url: ${{ secrets.ROCKET_WEBHOOK }}
If everything worked as expected we would get the notification in the chat and the file should be copied over to the server.

There is also support for other chat providers like Slack or you can build your own with the API and some code.
Manual Deployments
GitHub Actions being in infancy does not have a way to trigger workflows manually. This is something that people were struggling with on the internet. There are two ways to do this, Deployments and repository_dispatch events. It is best to refer to the linked GitHub API documentation for both. I prefer deployments as it is very robust and has a lot of additional features and parameters that you can pass through. First you will need to modify the first few lines to look like this:
name: Deploy

on:
  push:
    branches:
      - master
  deployment:
Then you can write a simple Python script to trigger the API:
auth_token = xxxx
headers = {'Authorization': auth_token, 'Accept': 'application/vnd.github.ant-man-preview+json', 'Content-Type': 'application/json'}
payload = {'ref': ref, 'required_contexts': [], 'task': 'test', 'auto_merge': False}
url = 'https://api.github.com/repos/:org/:repo/deployments'
r = requests.post(url, data=json.dumps(payload), headers=headers)
Replace :org and :repo with the organisation and repo name. You will also need to supply a token from GitHub settings with the :repo scope and that user will need to have admin privileges to this repository. You can also refer to the tasks passed in your workflow script with an if statement for steps or jobs like if: github.event.deployment.task == 'test'.
It is best to wrap this code around some helper script or application that can be a part of the overall deploy process.
Self hosted runners
It is also possible for you to run your own runners with self hosted runners if you do not want to use GitHub’s servers. For Kubernetes support I’ve found this project useful, but things are still very work in progress. There is no official support from GitHub, meaning things are still very buggy.


