This page gives you a detailed step by step guide of how to install the Arch Linux Base System on your PC or Laptop. We have covered all the steps with screenshots and all the details of configuration files and other settings have been included.
In our previous post, we have covered as why should you install Arch Linux and what are its best features that sets it apart from other distros. Today in this post we will cover as how to install the base system. As Arch aims to be a user centric, minimalist distro, we have covered this tutorial in two parts. In part one or this part, you will learn about how to install the basic system. After the base system is setup, you will have a full Linux installation running, but without the GUI or DE. In part two, we will tell our readers as how to install and configure a graphical interface and a desktop environment to use it for your daily needs.
Arch Linux is a lightweight distribution and doesn’t require much state of art hardware to run on. 256 megabytes of RAM will be more than enough for the command line install or a home server. If you plan to also install a graphical desktop environment (which more users would), I suggest you have atleast 512 mB of RAM for some light DEs such as XFCE, LXDE or OpenBox. If you plan to install Gnome and/or KDE, atleast 1 gB of RAM is recommended, though that will be more than enough. I have installed Arch Linux as my primary OS, and it takes 176 mB of RAM with a full fledged Gnome 3 desktop and 260 mB of RAM with servers and a workstation running.Lets get our hands dirty then. Here I have used a virtual machine with the following configs:
- 512 mB of RAM
- 2 core processors capped at 80% CPU usage
- 10 gB Hard Drive space
To start your work, you will need a CD installation image of Arch Linux from their Download page. There you will find two types of images, one is core image, another is net-install image. If you have a fast internet connection that easily gets configured, download the net-install one as it will download the packages from Arch Linux archives and you will have latest versions of packages. If you are on a slow connection or a wireless, use the core image which I prefer and have used here. Here is the list of Linux download managers that you can use for faster downloading, or if you are from India, head over to Arch Linux Indian mirror. Burn the image file on a CD or load it up in VirtualBox and boot from it. If you are new to Linux, I highly recommend to install it in a virtual machine before trying out to boot your PC from it.
After booting in, the first screen you will probably see is this. Note that all the info you will need to install will be displayed on screen, so read all the messages carefully before proceeding.
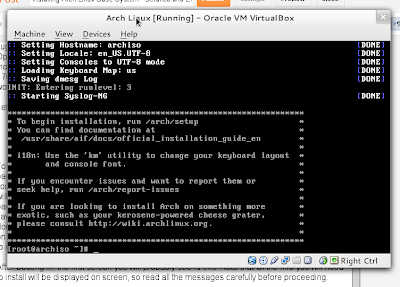 |
| Arch Linux Installation First Screen |
If you use a non US keyboard, you may need to change the keymap by typing km. If all runs well, simply type /arch/setup to start the installation. An ncurses based software will start up, which you can view by typing ALT+F1. If you need to see the output of Arch Linux Installation Framework (AIF), switch to it by typing ALT+F7.
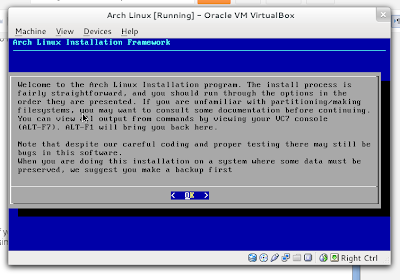 |
| Arch Linux Installation Framework Start Page |
Hit enter, you will be taken to main installation screen. Here you have to go to the options by one by one, one after the other. You can use the arrow keys to move up and down, keyboard to type something and enter to select.
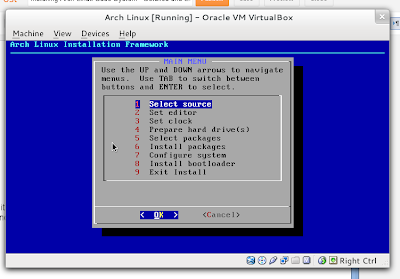 |
| AIF Main Installation Screen |
Select “Select Source” from the menu. The following screen will pop up.
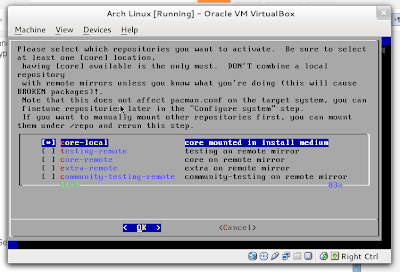 |
| Select Source AIF |
The core-local will contain the base packages needed for a simple Arch Linux installation. The rest, suffixed by remote are repos from remote servers. As we desired to do a offline installation, we wont need them now. You can select/unselect a repo (selected is denoted by *) by going to it using the arrow key and hitting the space-bar.
Once done, go to the next option from the main menu, that is “Set Editor”, i.e. the default text editor to be used to edit configuration files. I used nano here, if you think you are an expert, go with vi.
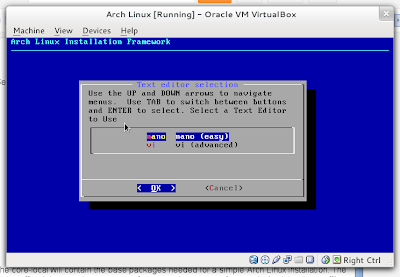 |
| AIF select Editor |
Next, go to “Set Clock > Select Region and Timezone and select yours from there. For me, its Asia > Kolkata (If you are from India, don’t be mislead by the Indian option in continents section). Next comes set the date and time, which you can either do UTC or localtime (UTC recommended). The clock will sync with you hardware clock, which mostly workd, but if it doesn’t, you can also set clock via NTP.
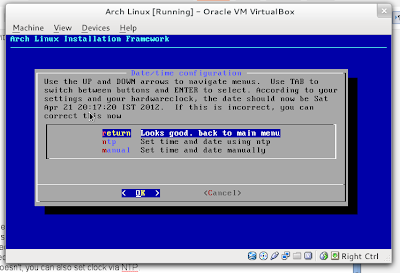 |
| Setting Clock in AIF |
Next comes the most tricky section, the preparation of hard disk (which can spell hell if you are not careful enough) so we will discuss them in detail.
 |
| Arch Linux Prepare Hard Drive |
As seen in the screenshot, the first option is for Auto Prepare which erases the entire contents in your hard drive (be careful). Next comes manually prepare hard drive that most users will do. So select it, you will be taken into a screen showing number of hard-drives you have. Select the one you want to install Arch to, and you will be taken to a cfdisk program to partition your drive. If you want to install Arch only on a specific partition, say /dev/sda2, you can select it from “other” option in the previous screen and enter the partition name as shown below.
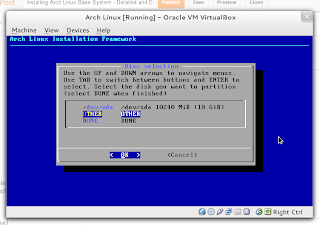 |
| Arch Linux Prepare Hard Drive |
 |
| Arch Linux Other Option |
Once in a cfdisk program, you can create a new partition using “new” option from, below menus and you will be asked to specify a size in bytes. I allocated 4 GB for root partition, 1 GB for swap and rest for home. Use arrow keys up an down to move through partitions, and right and left to move through below options. Once done, hit on write. My partition setup looks like this.
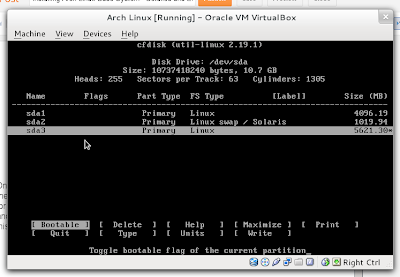 |
| Arch Linux cfdisk program |
Now we have to come to next option, thats manually configure mount-points where we will specify what partition will be used for what. Select it, select to choose by dev as it will be easier. Next select the partition and its mountpoint and labels (if any) as shown by screenshot s below.
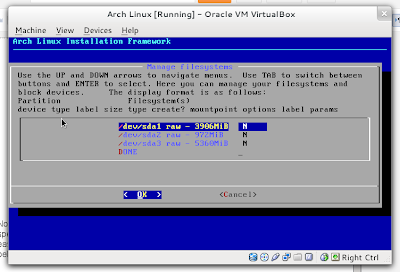 |
| configure mountpoint AIF 1 |
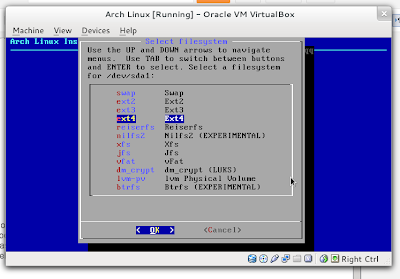 |
| configure mountpoint AIF 2 |
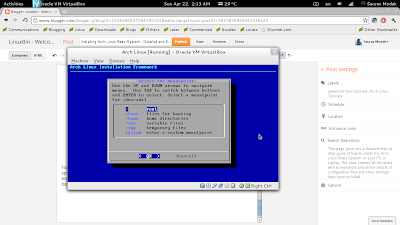 |
| configure mountpoint AIF 2 |
Once done go back to the main menu, we have come to the screen of selecting packages. First you will have an option to select a bootloader, which most people prefer as GRUB. Next you will come to the following screen where you will have to select group of packages. Select both base and base-devel as sooner or later you will need it by hitting spacebar. Selected packages are shown by *.
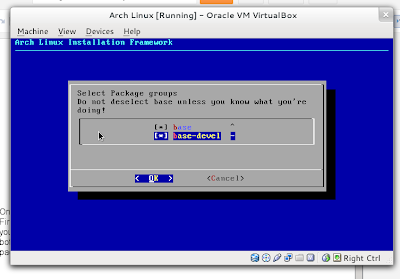 |
| Arch Linux Select Packages |
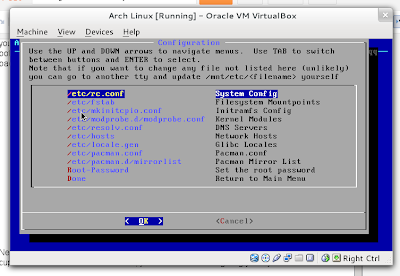
Next screen, you will be able to install the packages. It will take some time, so get yourself a cup of coffee while its done. After that, you can continue configuring your system. Here is the configuration screen.
 |
| AIF configuration screen |
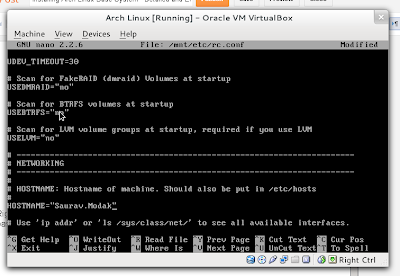
Right now, we need to configure three things. The rc.conf file, the mirror list and the root password. The rc.conf contains the most general settings, so fire it up and go to “hostname”.
 |
| configuring hostname arch linux |
You can give your computer a custom name as I have done, or leave it as it is. Save the file using Control+o and exit using Ctrl+x. Next go to mirrorlist file and uncomment (i.e. remove # sign before the address) from the server nearest to you, as I have done for India.
 |
| uncommnenting mirror arch linux |
Next, type a root password, and then “done”. Congrats, you have successfully installed a basic version of Arch in your system, but there are more things to follow in our next tutorial, so stay tuned and subscribe to our RSS feeds to get instant updates.
You can either install the bootloader, GRUB as we selected earlier and then exit the install. If you have more than one OS installed, consider reading adding more operating systems to GRUB. If you have Ubuntu, you will need to login to the system and run update-grub to bring Arch up in GRUB menu at bootup. Do tell us how it went and any problems that you faced, I will be ready to help 🙂
Disclaimer: I have avoided configuration which may confuse you up and may hamper the simplicity of the tutorial. Advanced configuration will be taken up whenever felt necessary. Nevertheless, Arch will run with simple configurations mentioned above. If however, you feel the urge to know more about configuration files, have a look at resources below.



The flow is just like that of slack. 😀
Thats what all minimalist distros aim for, including slackaware, gentoo, sorcerror or sourcemage. But Arch has one advantage, it has got its own binary package installer to installing it is a bit easier and obviously faster. Though you can compile Arch from source too, by using the ABS if you desire 🙂
Thanks buddy for the post. Followed the steps on VirtualBox. Waiting for part II.
Happy it helped. If you are impatient enough u can have this good tutorial for installing Arch Linux, everything is given in detail there. Also dont forget to read the official wiki. Once you install arch, you wont look back.
Hello Saurav thanks for the initial part. But can you please upload another with further details of GUI and all. Thanks in advance
Sure, keep visiting this blog for updates, I will post the new version soon 🙂
The new CD does not include AIF, so I stuck at how to offline install with pacstrap since I met some network errors.
I will update the blog with new installation tutorial soon. Be sure to visit this site often 🙂