Introduction
WireGuard is now the most-hyped VPN implementation out there. Boasting code length of a fraction of the lines of code compared to IPSec, strong cryptography, a high-speed Linux kernel implementation and recent inclusion into Linux kernel tree in version 5.6, it is now the go-to choice for people seeking to roll out site-to-site VPNs without the overhead and complexity associated with traditional VPNs.
Most consumer grade and commercial grade routers still do not have support for WireGuard, simply because it is relatively new and networking product manufacturers do not consider it production-grade yet. However, WireGuard is already in use in enterprise tunnelling solutions like CloudFlare WARP, Mozilla VPN, NordLynx and many commercial anti-censorship VPN providers allow incoming connections with the WireGuard protocol.
If you are home or SOHO user using an ASUS ARMv8 64-bit chipset router like RT-AC86U or RT-AX88U, you are in luck. You can flash ASUSWRT-Merlin firmware, install Entware and then follow this guide to set up WireGuard. The setup is straightforward as the kernel versions (4.1.27 and 4.1.51) are supported out-of-the-box for the Linux kernel implementation.
However, if you have an old ARMv7 32-bit router with ASUSWRT-Merlin support like ASUS RT-AC68U or a router from a different manufacturer having same chipset with a Merlin port like the Netgear Nighthawk R7000, you see that the ASUSWRT-Merlin firmware is built on Linux 2.6.32 which is below the minimum required version for the Linux kernel implementation. If you have Entware installed, there will be a wireguard-go package which uses the userspace Go implementation. However, the wireguard-go binary installed by the Entware package is buggy: it crashes often and on some routers it will not start at all. I am writing this guide to provide a solution to work around this issue and get you started with WireGuard in the fastest way.

Prerequisites
You might have a rough idea about what we require. However, to avoid any confusion and ambiguity in the future, I am stating the requirements:
- Broadcom ARMv7 32-bit chipset router running ASUSWRT-Merlin firmware or a port like ASUS RT-68U, Netgear R7000, Linksys EA6900, etc.
- SSH access enabled.
- Flash drive connected to one USB port and formatted to ext4 to expand the file system.
- Entware repository added for extra packages.
- 2GB swap file created on USB drive for higher virtual memory (as wireguard-go requires more than 256MB available memory to work efficiently).
Compiling and installing WireGuard-Go
Once we have all the prerequisities, SSH to your ASUSWRT-Merlin router. You can use PuTTY on Windows or OpenSSH on Linux.
ssh <username>@<router_ip>
Once you are in the shell, we need to first install the basic WireGuard utilities package from Entware, i.e., wireguard-tools. This includes the wg command-line tool, a netifd protocol helper, and a re-resolve watchdog script.
opkg install wireguard-tools
In the usual case, we would install wireguard-go, but since the version provided by Entware is non-functional, we will compile by ourselves. First lets install git.
opkg install git git-http
Then navigate to the root of the USB flash drive plugged into the router that we are using to extend the ext4 file system of the router.
cd /mnt/<mount_point_of_USB>
Then clone the wireguard-go repository in that path.
git clone https://github.com/WireGuard/wireguard-go
Now, to compile wireguard-go, we will need the Go language compiler. So let’s install that.
opkg install go_nohf
nohf means that the Go compiler is for ARMv7 systems that have no dedicated floating point unit (FPU), which is true for Broadcom ARMv7-based consumer routers. If we install the generic ARMv7 version, the executables output by the compiler may or may not execute on the router.
Now, before we can compile wireguard-go, we will need to apply some changes make sure that it runs smoothly on the resource-constrained router. What we will do is copy some queue and buffer constants from the Android configuration to the default configuration.
cd wireguard-go
cd device
mv queueconstants_default.go queueconstants_default.go.bak
cp queueconstants_android.go queueconstants_default.go
cd ..
Now, let’s compile wireguard-go
go build -o wireguard-go
It will take about a minute ot two. Once the shell prompt comes back, a working binary named wireguard-go will be created. We need to copy into the Entware executables directory /opt/bin and assign the required permissions.
cp wireguard-go /opt/bin/wireguard-go
chmod 755 /opt/bin/wireguard-go
exit
At this point the WireGuard Go implementation is installed and roaring to run.
Setting up a site-to-site tunnel and enabling WireGuard to run at router boot
At this point, one can configure and run WireGuard by using wireguard-go binary and wg utility alone but it will be tedious. We prefer the same flexibility as using WireGuard on servers and desktop computers. So we will need two components: the wg-quick helper script and a Entware init script to fire up WireGuard interfaces when the router boots up.
First of all, download this zip file containing the necessary scripts.
The wg-quick script can be copied to the router from any computer that has WireGuard installed using scp. On Linux/Unix systems, it is as simple as doing.
scp `which wg-quick` <username>@<router_ip>:/opt/bin/wg-quick
If you do not have WireGuard installed anywhere yet, then you can extract given zip file and copy the wg-quick file to /opt/bin/wg-quick.
unzip wireguard-scripts-rt68u.zip
scp ./wg-quick <username>@<router_ip>:/opt/bin/wg-quick
Finally, you will need to copy the Entware init script named S20wireguard to the router.
unzip wireguard-scripts-rt68u.zip
scp ./S20wireguard <username>@<router_ip>:/opt/etc/init.d/S20wireguard
Windows users can use WinSCP to copy it to the correct locations.
Once that is done, login to the router again and assign necessary permissions to the scripts that were just uploaded.
chmod 755 /opt/bin/wg-quick
chmod 755 /opt/etc/init.d/S20wireguard
Finally, our WireGuard setup is complete. At this point, we can run any WireGuard site-to-site VPN of our choice. You can follow the instructions from the guide on Techno FAQ or Linode about configuring the router as client or server according to your needs. You need to ignore the Ubuntu/Debian related stuff. Also, remember to put required firewall rules in the PostUp = and PostDown = fields. Keep in mind that the configuration directory for WireGuard on ASUSWRT-Merlin is /opt/etc/wireguard/ and not /etc/wireguard/.
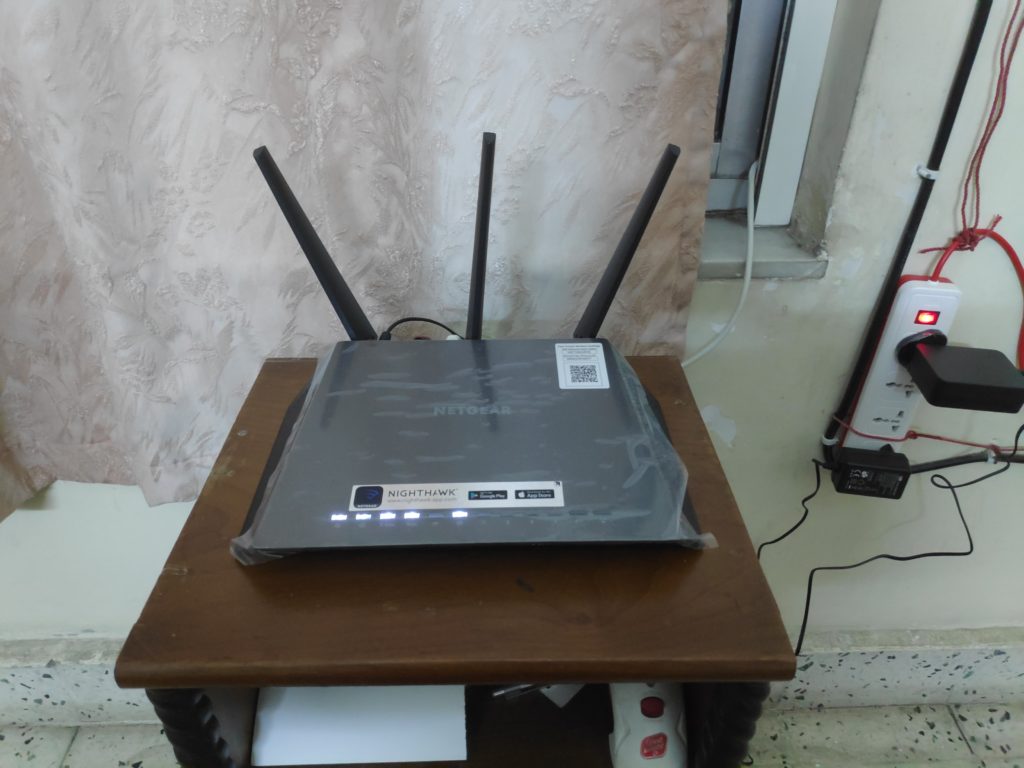
As an example, let me show you one of my own setups. I have two routers running ASUSWRT-Merlin, one ASUS RT-68U at my University workspace lab running as a server and one Netgear Nighthawk R7000 at my living quarters. Both the routers are on the campus wide area network. The ASUS RT-68U has a static IP address of 172.16.113.187 and the Netgear Nighthawk R7000 gets its IP configuration using DHCP without any fixed address. The internal networks of the ASUS RT-68U are 192.168.10.0/24, 192.168.11.0/24 and 192.168.12.0/24 serving the devices in my lab, while those of the Netgear Nighthawk R7000 are 192.168.7.0/24, 192.168.8.0/24 connecting the computers, printers, media players and TV at my home inside the campus. My goal is to ensure seamless connectivity between the two routers’ internal networks, so that I can access home networks from lab and lab networks from home.
I made a configuration named /opt/etc/wireguard/sts0.conf on both the routers.
On the ASUS RT-68U (server) the contents are like this:
[Interface]
Address = 100.64.64.1/32
SaveConfig = true
PostUp = iptables -I INPUT -p udp --dport 55555 -j ACCEPT; iptables -I FORWARD -i sts0 -j ACCEPT
PostDown = iptables -D INPUT -p udp --dport 55555 -j ACCEPT; iptables -D FORWARD -i sts0 -j ACCEPT
ListenPort = 55555
PrivateKey = [hidden]

[Peer]
PublicKey = CTeGFvjWXEHhAo6/ADhLWDo9LdCYrE/Ff5XeqyEmIXU=
AllowedIPs = 100.64.64.2/32, 192.168.7.0/24, 192.168.8.0/24
On the Netgear Nighthawk R7000 (client) the contents are:
[Interface]
Address = 100.64.64.2/32
PrivateKey = [hidden]
PostUp = iptables -I FORWARD -i sts0 -j ACCEPT
PostDown = iptables -D FORWARD -i sts0 -j ACCEPT

[Peer]
PublicKey = SkmD4R2lfLq/+EIXReK+2LAk6eiGslB4bQ33FbjD0BY=
AllowedIPs = 192.168.10.0/24, 192.168.11.0/24, 192.168.12.0/24, 100.64.64.1/32
Endpoint = 172.16.113.187:55555
PersistentKeepalive = 10
From the configuration files above, you can see that the server is listening on port 55555, while the client is connecting to 172.16.113.187 on port 55555. I am running a point-to-point network in the WireGuard interface between the server (100.64.64.1) and client (100.64.64.2). I am allowing the required point-to-point address and subnets of the other side in the AllowedIPs = field in the [Peer] section in both the server and client configs. In the client config I have set keep-alive to 10 seconds to inform the server as soon as possible if the external/WAN IP address of the client has changed due to DHCP renewal and to keep the WireGuard tunnel active. Finally, in the server, the PostUp = and PostDown = fields have IPTables rules allow incoming connections to UDP port 5555 and enable forwarding of packets received from the sts0 WireGuard interface. Since the client only sends outbound WireGuard connection to the server, only the packet forwarding IPTables rule is added here.
You can use this example to create your own site-to-site tunnel according to your needs.
Once that is done, you need to start the WireGuard interface using the command:
wg-quick up sts0
You should substitute sts0 if you are using a different configuration filename.
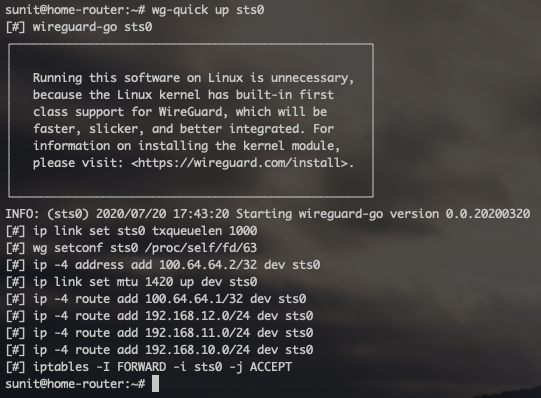
You should then see something like this that will tell you that the interface is up and functional.

You can safely ignore the warning that advises using the Linux kernel module (since there is none for 2.6.32 kernel).
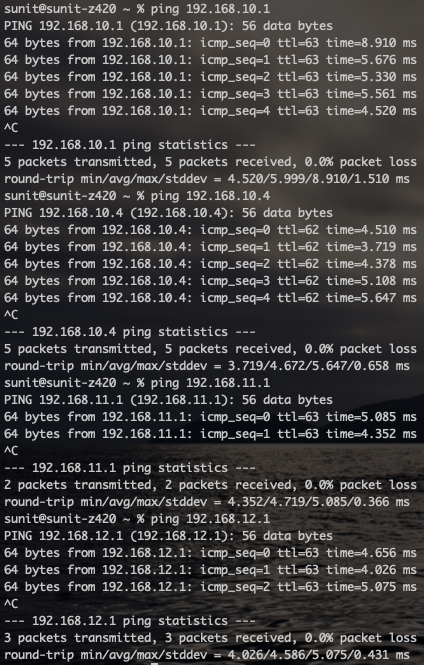
Once that is done, you can ping the subnets on the other side that are allowed in your configuration. If everything is ok, you will get a response.

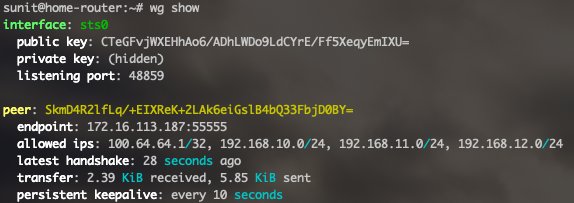
Typing wg-show on the router should show details and statistics of the running WireGuard tunnel.

Your WireGuard site-to-site VPN is up and running.
Alternate configuration: connecting to a commercial VPN provider and using policy routing to route selective devices
Ok so what if you are not interested in a site-to-site VPN? What if you have a NordVPN, Mullvad, PIA or any commercial VPN for unblocking geo-blocked content and getting around censorship issues? Well, in that case you can follow this guide that details setup of a commercial VPN and using policy routing for forwarding selected devices on the LAN over the VPN service provider. Since the guide is written for RT-AC86U and RT-AX88U, you can ignore first part of Step 1 and start following the steps from “ㅡ User space tool ㅡ” onwards.
Conclusion
That’s it folks! This is the easiest way that I know to use WireGuard on Broadcom ARMv7 chipset routers running ASUSWRT-Merlin. Obviously this is not as fast as running WireGuard on devices having a newer Linux kernel that can support the WireGuard kernel module, but provides more bandwidth, less latency and less CPU usage compared to the inbuilt OpenVPN, PPTP or IPSec protocols. On my 80 Mbps usable bandwidth from my living quarters to the lab, I get a throughput of 55 Mbps or so, compared to 15-20 Mbps on OpenVPN. Moreover, WireGuard is much easier to set up and maintain.
If you have any comments or queries, feel free to post in the comments section below.


Good one. Thanks for sahring. I have Asus RT-AC58U AC1300 Dual band router. Not using it now. Is this model ok for reconfiguration?
Hello! Trying to do this for my RT-AC87U router which I believe is a ARMv7 router. I cannot get past the : opkg install wireguard-tools command. I get “unknown package” error. Can you help?
Hi Pascal.
I have the same issue. Where you able to resovle the problem?
BR
Chris
How do you set the PATH and variable environmental for Go. I always get the -sh: go: permission denied when I tried to go built. Thank you
Hi,
Near as I can tell, to get the Wireguard libraries installed you need to add them manually:
https://www.snbforums.com/threads/experimental-wireguard-for-hnd-platform-4-1-x-kernels.46164/
$ wget https://github.com/odkrys/entware-makefile-for-merlin/raw/main/wireguard-kernel_1.0.20210219-k52_1_aarch64-3.10.ipk
$ opkg install wireguard-kernel_1.0.20210219-k52_1_aarch64-3.10.ipk
(I have not tested this yet to see whether it works)