Introduction
I live in an university campus. Sometimes my work involves building small computer networks to connect devices together and to the Internet for personal, work and experimental use. I have had many cases where the situation would become awkward:
- There may be no wired connectivity to the upstream campus network, but campus WiFi is accessible.
- Devices I use may not have WiFi radio but have Ethernet (wired) connectivity.
- Devices cannot connect to the Internet because the campus WiFi signal is too weak.
In all of the above cases, you will need network equipment to connect to the campus WiFi and extend the network and/or create a second network where the devices in question will connect. But here’s the catch: the campus WiFi is secured with 802.1X EAP. Most consumer equipment and many entry-level professional equipment is usually not able to connect to or extend a 802.1X EAP secured WiFi network. So what do you do? You get yourself a Mikrotik device of your requirement.
Mikrotik devices, including the RouterBOARD series, run RouterOS, a Linux-based router distribution that can do just about anything a network administrator may need or use. This makes Mikrotik devices some of the most flexible computer networking devices ever made. Even a low-cost US$80 Mikrotik device has features rivaling US$300+ professional grade equipment.
In my case, I had a Mikrotik hAP ac and a Mikrotik SXT 5 ac lying around from previous experimental work. I decided to use each in two different occasions in order to bring Internet connectivity to my personal networks. In this article I am going to share the method to use a Mikrotik device to connect to a 802.1X protected WiFi network and use it to extend connectivity to your personal network. In other words, the WiFi network your RouterBOARD is connected to will become the “WAN port” of your personal network.

Choosing the correct equipment
The first step to ensure stable connectivity is to get the correct equipment for the task at hand. Mikrotik has a lot of products and the complete list is here. You need to choose the correct one to match your needs. If the organization WiFi is available in the same building you are presently in, you can go for any regular home or SOHO access point. If the nearest WiFi access point is a significant distance away or in a different building, you will be better off with outdoor wireless equipment.


Upgrading RouterOS and resetting to factory defaults
Most Mikrotik devices on the factory installed version of the OS lack support for 802.1X in WiFi client mode. Hence, it is imperative that you upgrade your version of RouterOS to the latest one including all the extra packages. You can do so by going to the RouterOS download page here and grabbing the one that says ‘Extra packages’. There is no need to download ‘Main package’ because ‘Extra packages’ has everything you need.

Once you download the zip archive, extract it to some location on your computer. The connect your computer (PC or laptop) to any of the wired LAN ports and follow the steps in this guide to upgrade to the latest RouterOS version.
A Mikrotik device can be managed via the web interface (also called Webfig) and a Windows app called Winbox. Webfig can be accessed by pointing your browser’s address bar to the IP address of the Mikrotik device. For Winbox, you need to download the app and run it.
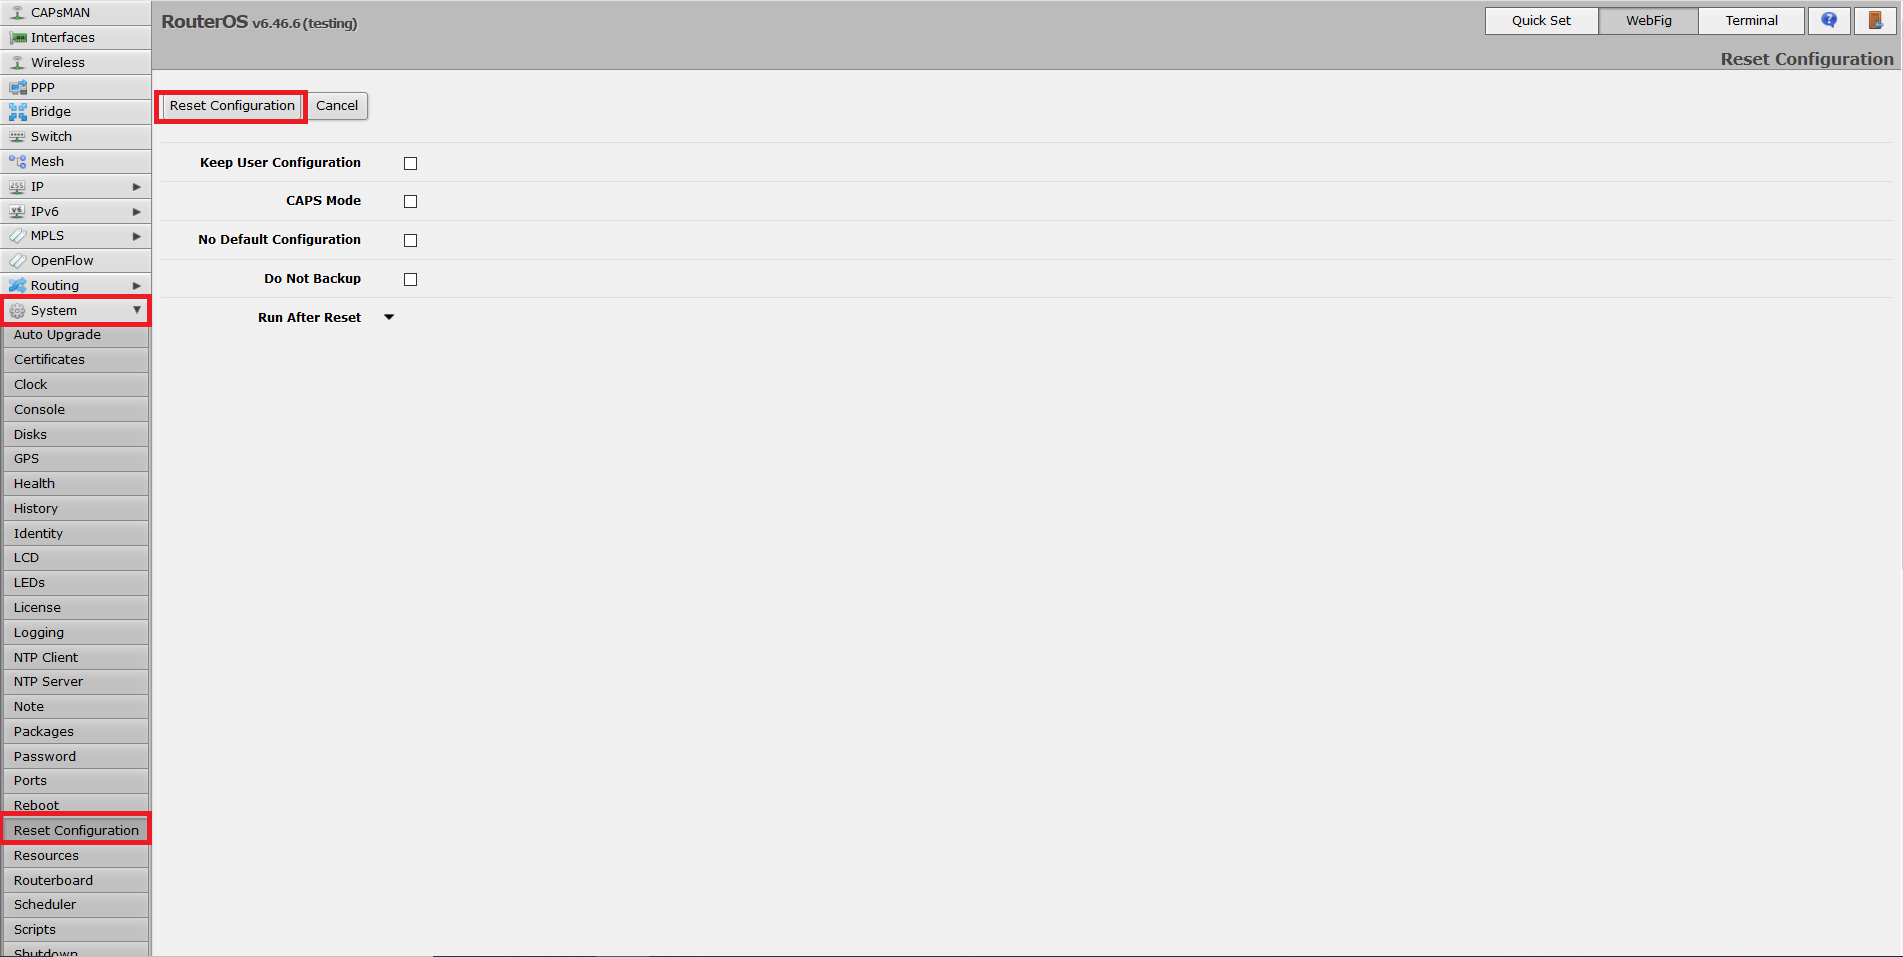
Once you are done upgrading, it is recommended to start from a fresh configuration by performing a factory reset. To do so, login to the Mikrotik device using Winbox or Webfig (the web interface), click ‘System’ on the right side pane, then click ‘Reset configuration’ from the drop-down. Finally, leaving all options unchecked, click the ‘Reset Configuration’ button.
The device will reboot and in 30 seconds it will boot up to factory default configuration. The default IP address of Mikrotik device is 192.168.88.1 and you will be automatically given an IP address in the 192.168.88.0/24 subnet by DHCP. Make sure that you are still connected to the Mikrotik device on the wired LAN ports before moving on to the next steps.
Connecting to upstream WiFi
Depending on your hardware, your Mikrotik device will have one or more wireless interfaces. If you have a dual-band home or SOHO AP, you will have one for 2.4 GHz (wlan1) and one for 5 GHz (wlan2), apart from the Ethernet interfaces. If you have an outdoor equipment, it will most likely have one wireless interface for 5 GHz (wlan1-gateway) and one Ethernet interface (ether1-local). At this point, you need to choose which band you need to connect to the upstream WiFi network. If your device has only a single band, it is a no brainer. If your device is dual-band, the rule of the thumb is to go for 5 GHz for more spectrum width, better throughput and less neighbour interference, and 2.4 GHz in case 5 GHz is weak or non-operational.
As an example, I am using a SXT 5 ac which is a single band (5 GHz) outdoor wireless device. The wireless interface is wlan1-gateway and I am connected to it from my laptop using an Ethernet cable connected to ether1-local. All screenshots in this article are from the SXT 5 ac outdoor radio, except those mentioned otherwise.
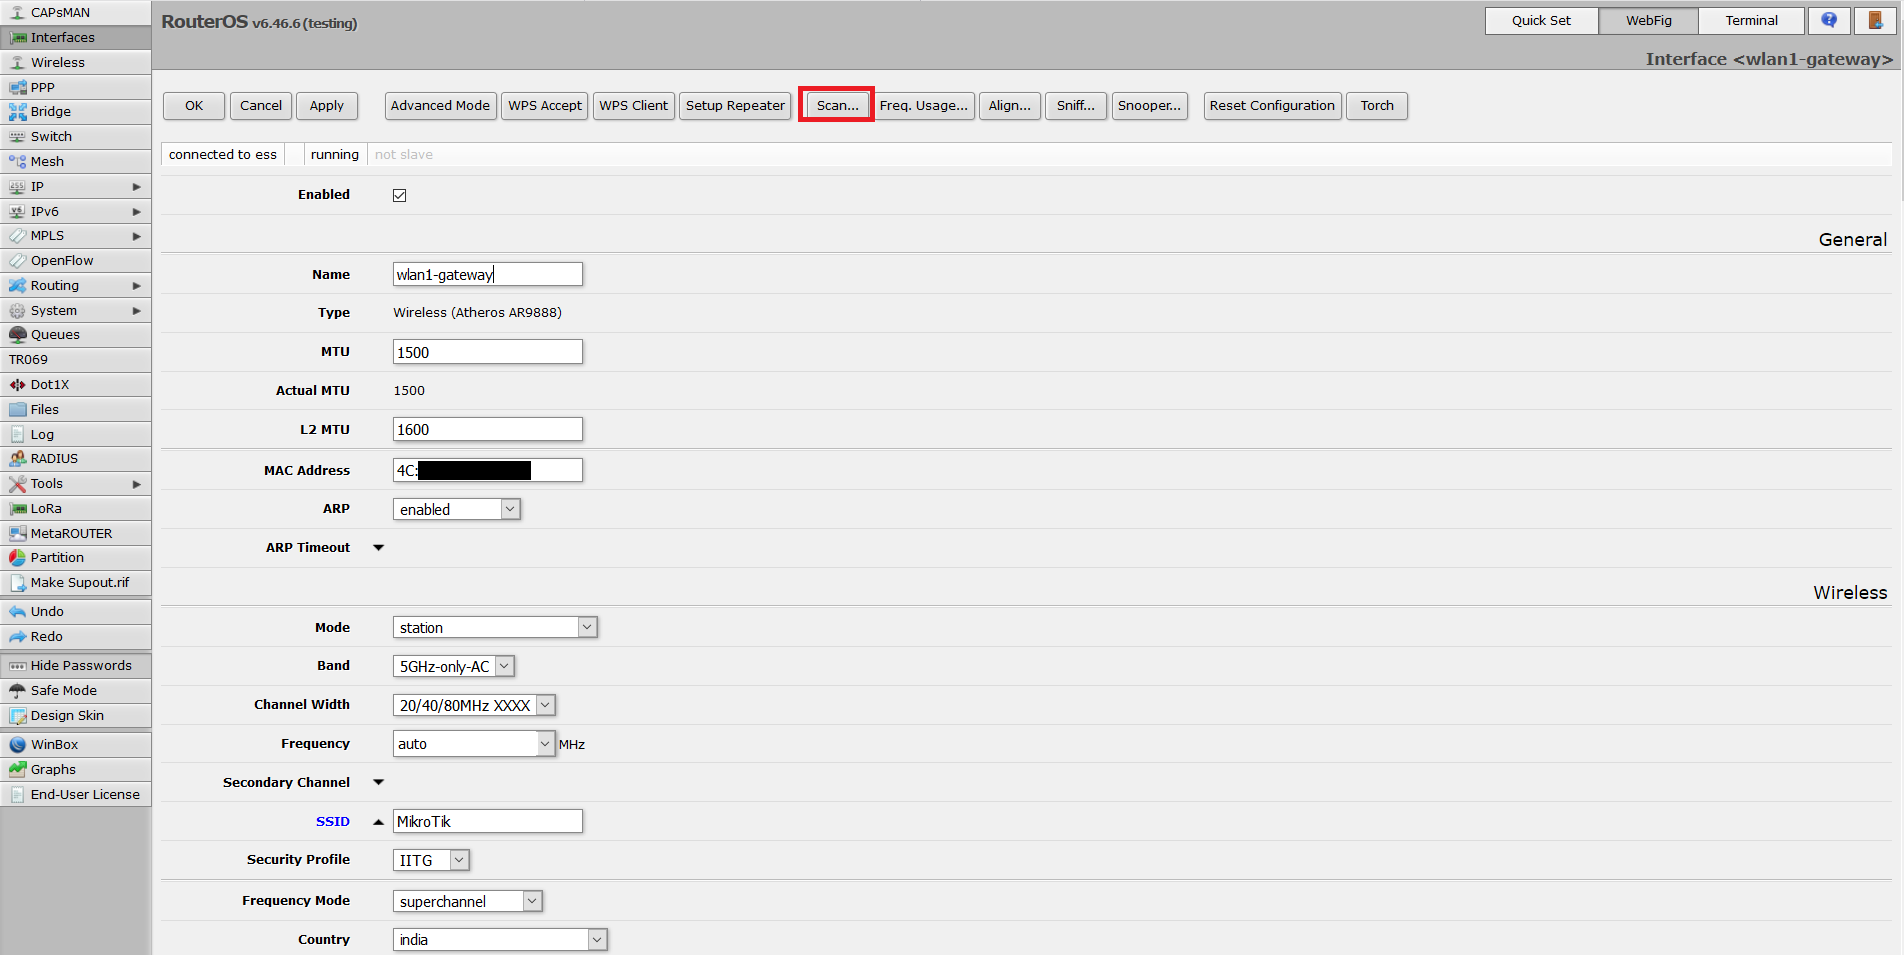
Once logged into Winbox or Webfig, I see this.

Click on the interface you would like to use to connect, and click the ‘Scan’ button and then click ‘Start’ to see if the desired upstream WiFi network is visible. If yes, click ‘Close’ and continue.
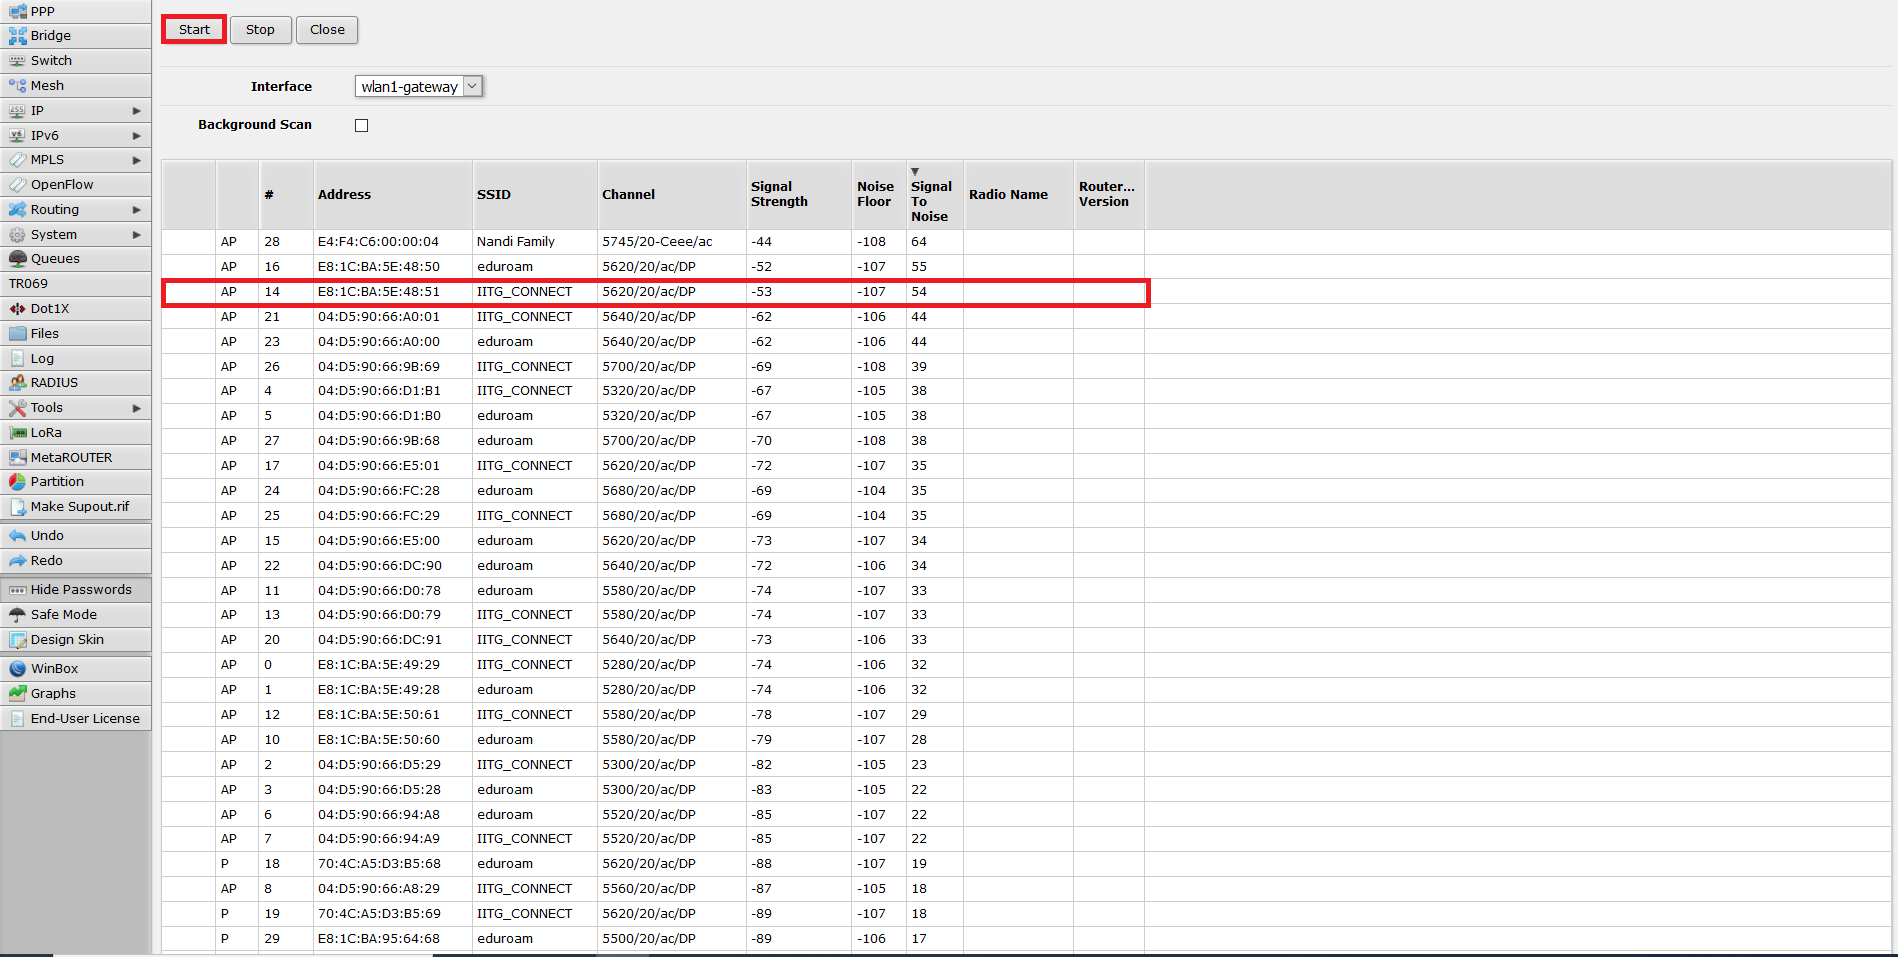
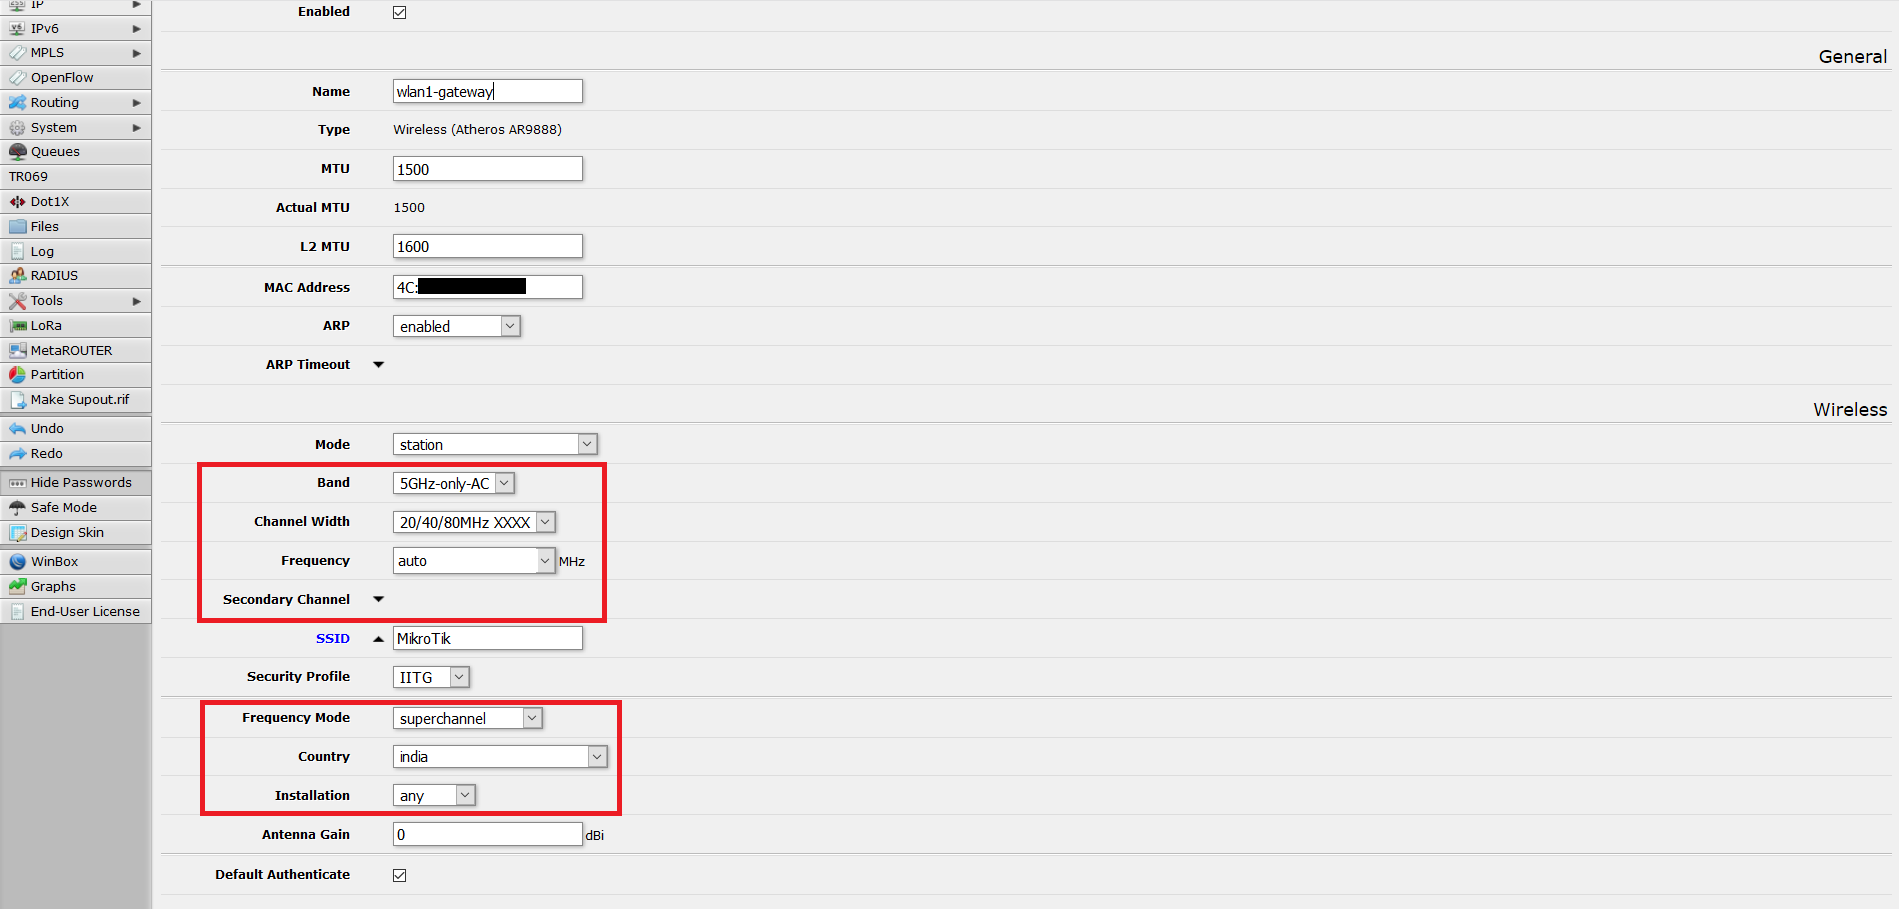
Otherwise, click ‘Close’, adjust the ‘Band’, ‘Channel width’, ‘Frequency Mode’, ‘Country’ and perform the scan again. Keep doing so till the desired network is visible. My recommendation is to set ‘Country’ to the name of the country you reside in, ‘Frequency Mode’ to ‘superchannel’ and installation to ‘any’ and see if it works. Once you are sure that it works, copy the network name, a.k.a., SSID and note it down somewhere.
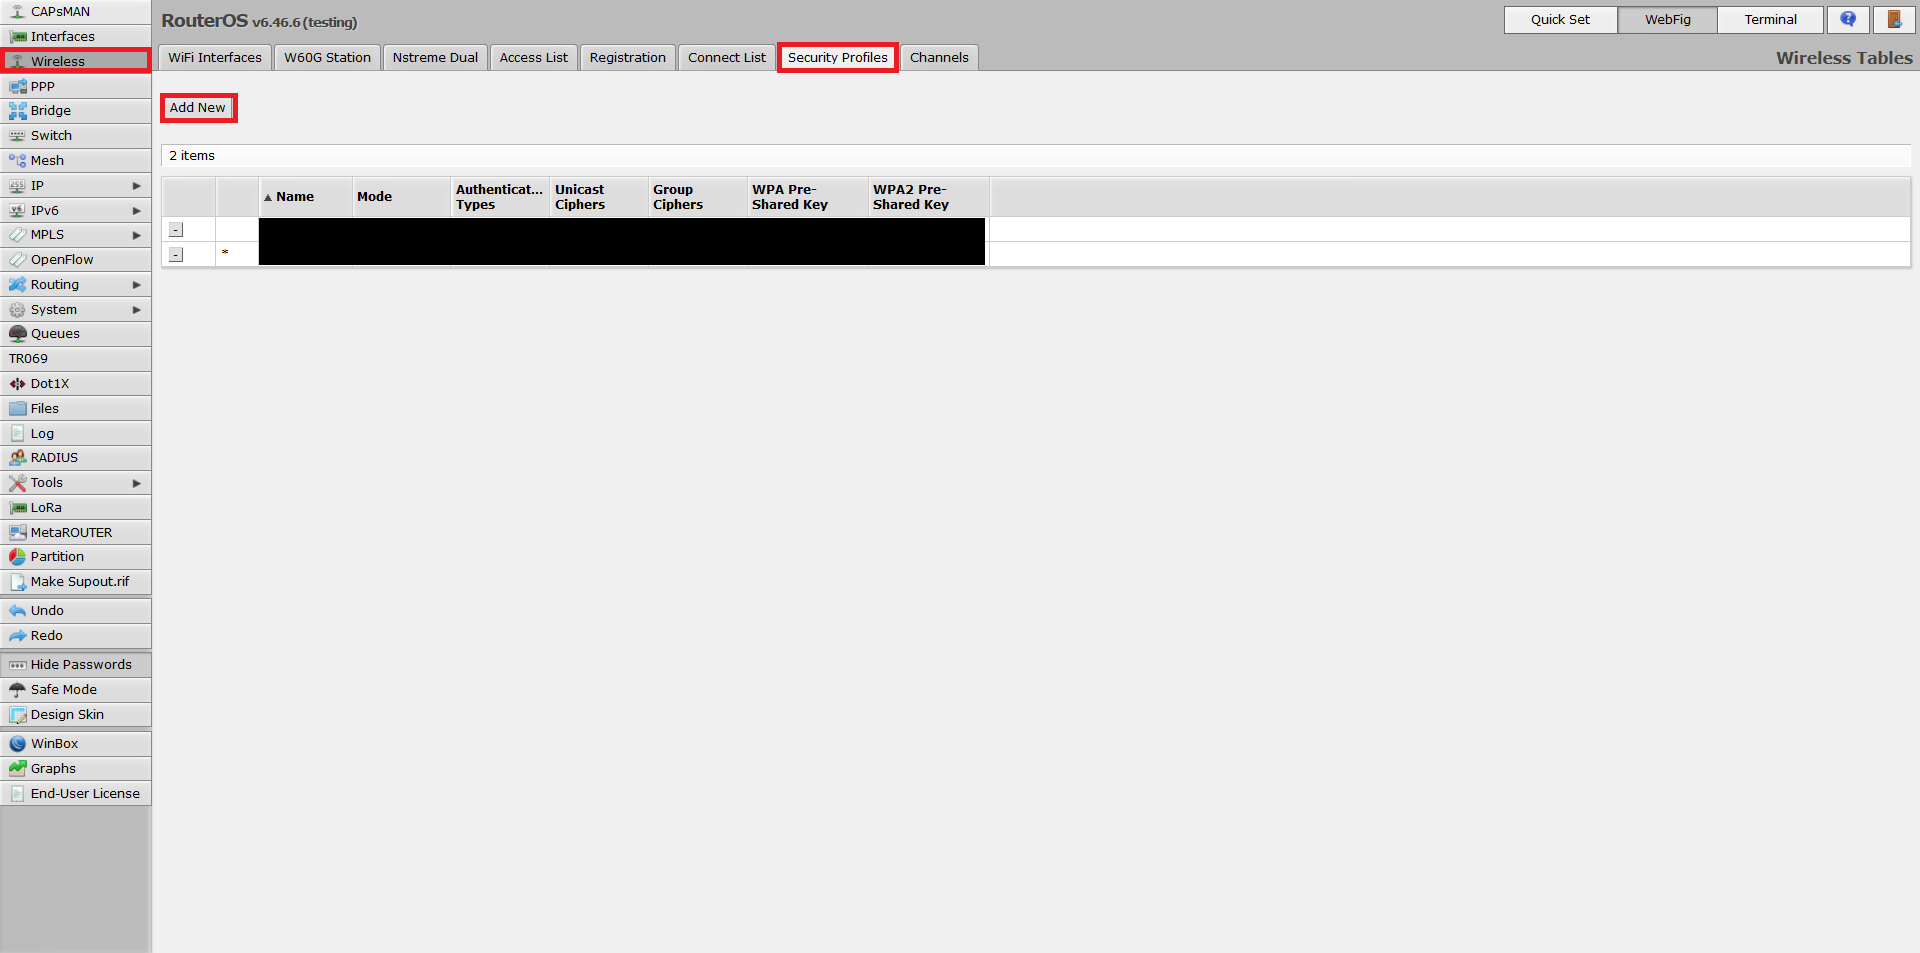
Click the ‘Wireless’ button on the right side menu, then click the ‘Security Profiles’ tab. Click ‘Add new’ button.
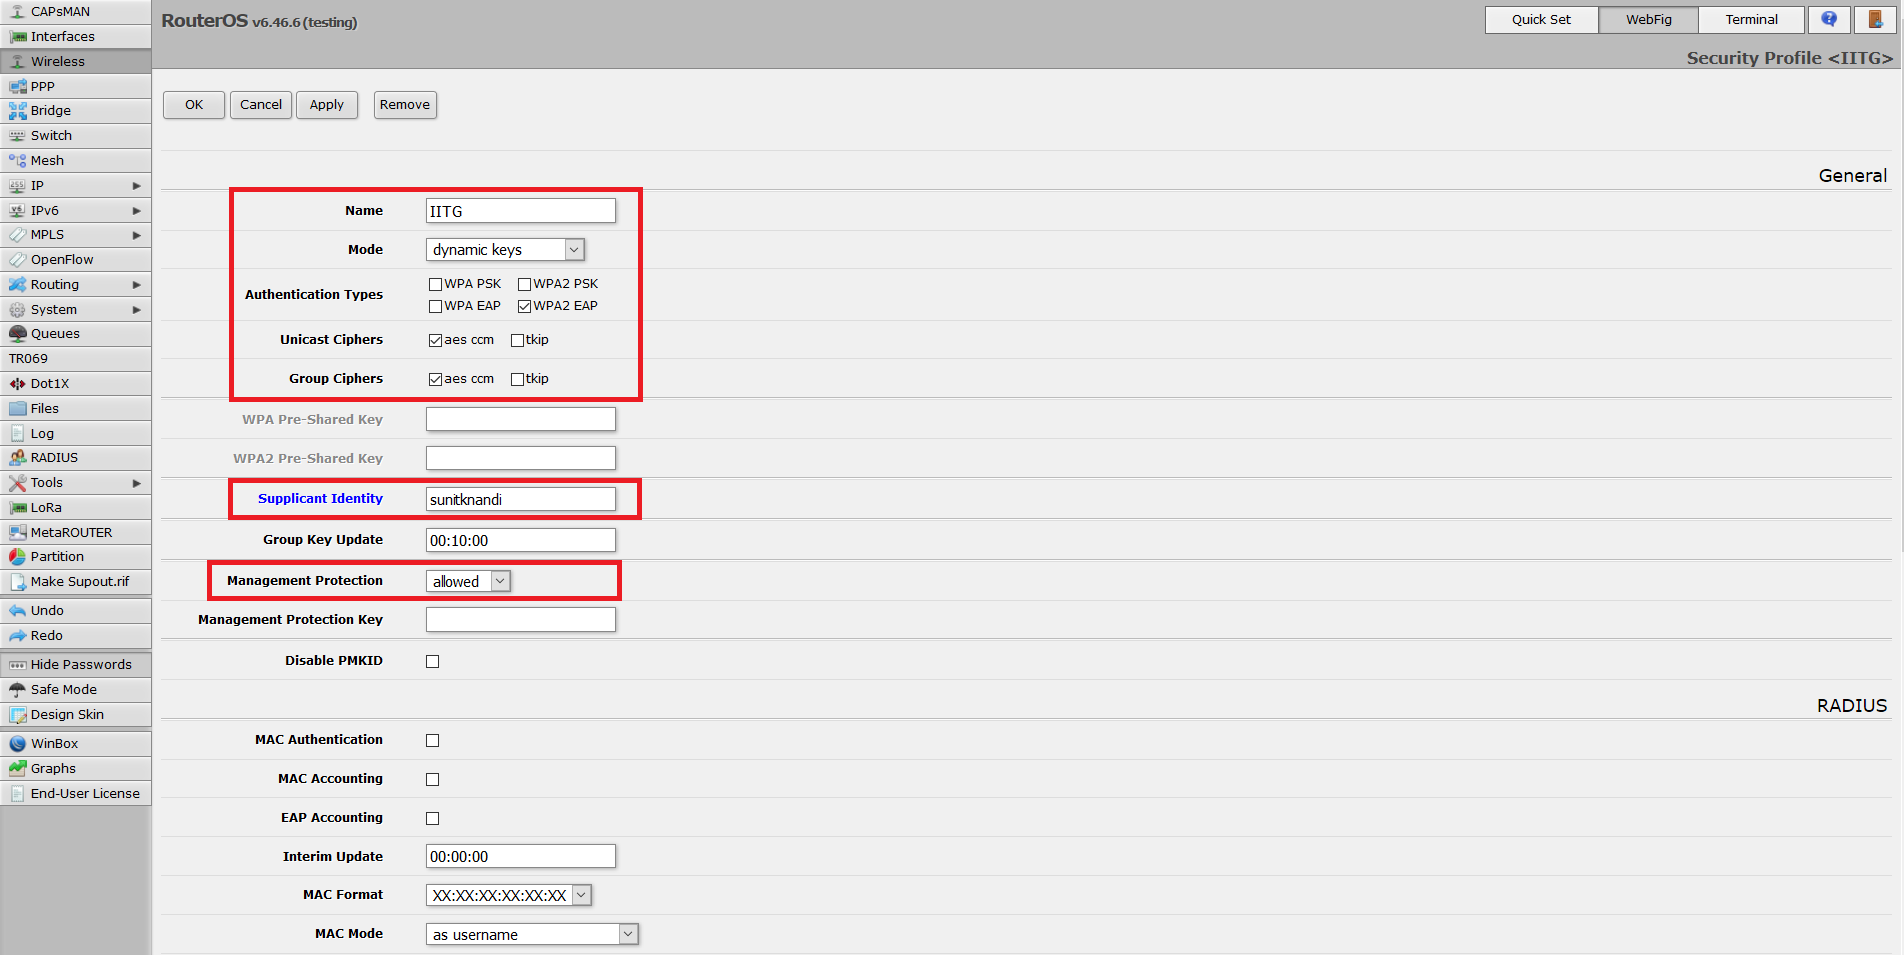
Give it a name of your choice. Since we are going to connect to an 802.1x EAP network, set ‘Mode’ to ‘dynamic keys’ and checkmark only ‘WPA2 EAP’ in ‘Authentication Types’. Most modern 802.1x based networks don’t use WEP or WPA any more. Next in ‘Unicast Ciphers’ and ‘Group Ciphers’ each, checkmark ‘aes ccm’ only. ‘tkip’ has vulnerabilities and is not recommended. In ‘Supplicant Identity’ put in your identity as given by your organization. It is either your LDAP, Active Directory or RADIUS username. Set ‘Management Protection’ to ‘allowed’ and everything else unchanged.
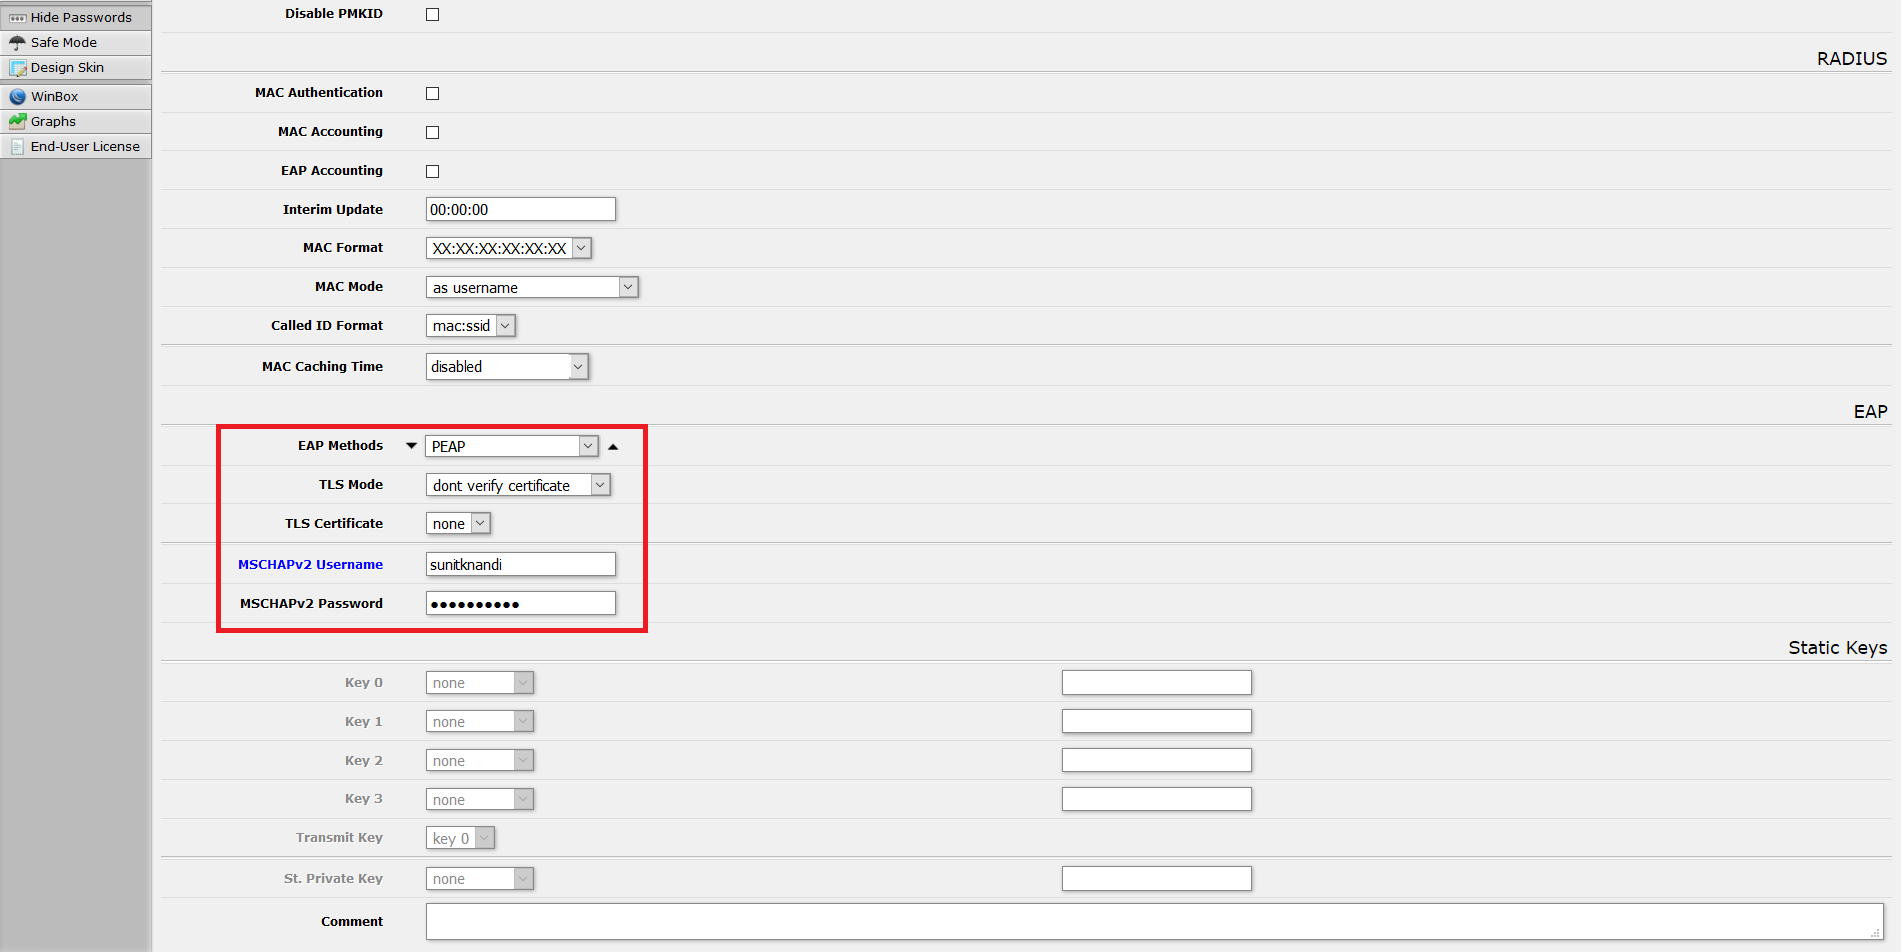
Scroll down till you reach ‘EAP Methods’. Choose the one that your organization has configured out of ‘EAP-TTLS MSCHAPv2’, ‘EAP-TLS’ and ‘PEAP’. In my case, my University has PEAP set up. The instructions for ‘TLS Mode’ and ‘TLS Certificate’ again will be given by your organization. In my case, it is ‘don’t verify certificate’ and ‘none’ respectively. Finally, put your username and password in ‘MSCHAPv2 Username‘ and ‘MSCHAPv2 Password‘ respectively. In most cases, your username will be same as what you typed in ‘Supplicant Identity’.
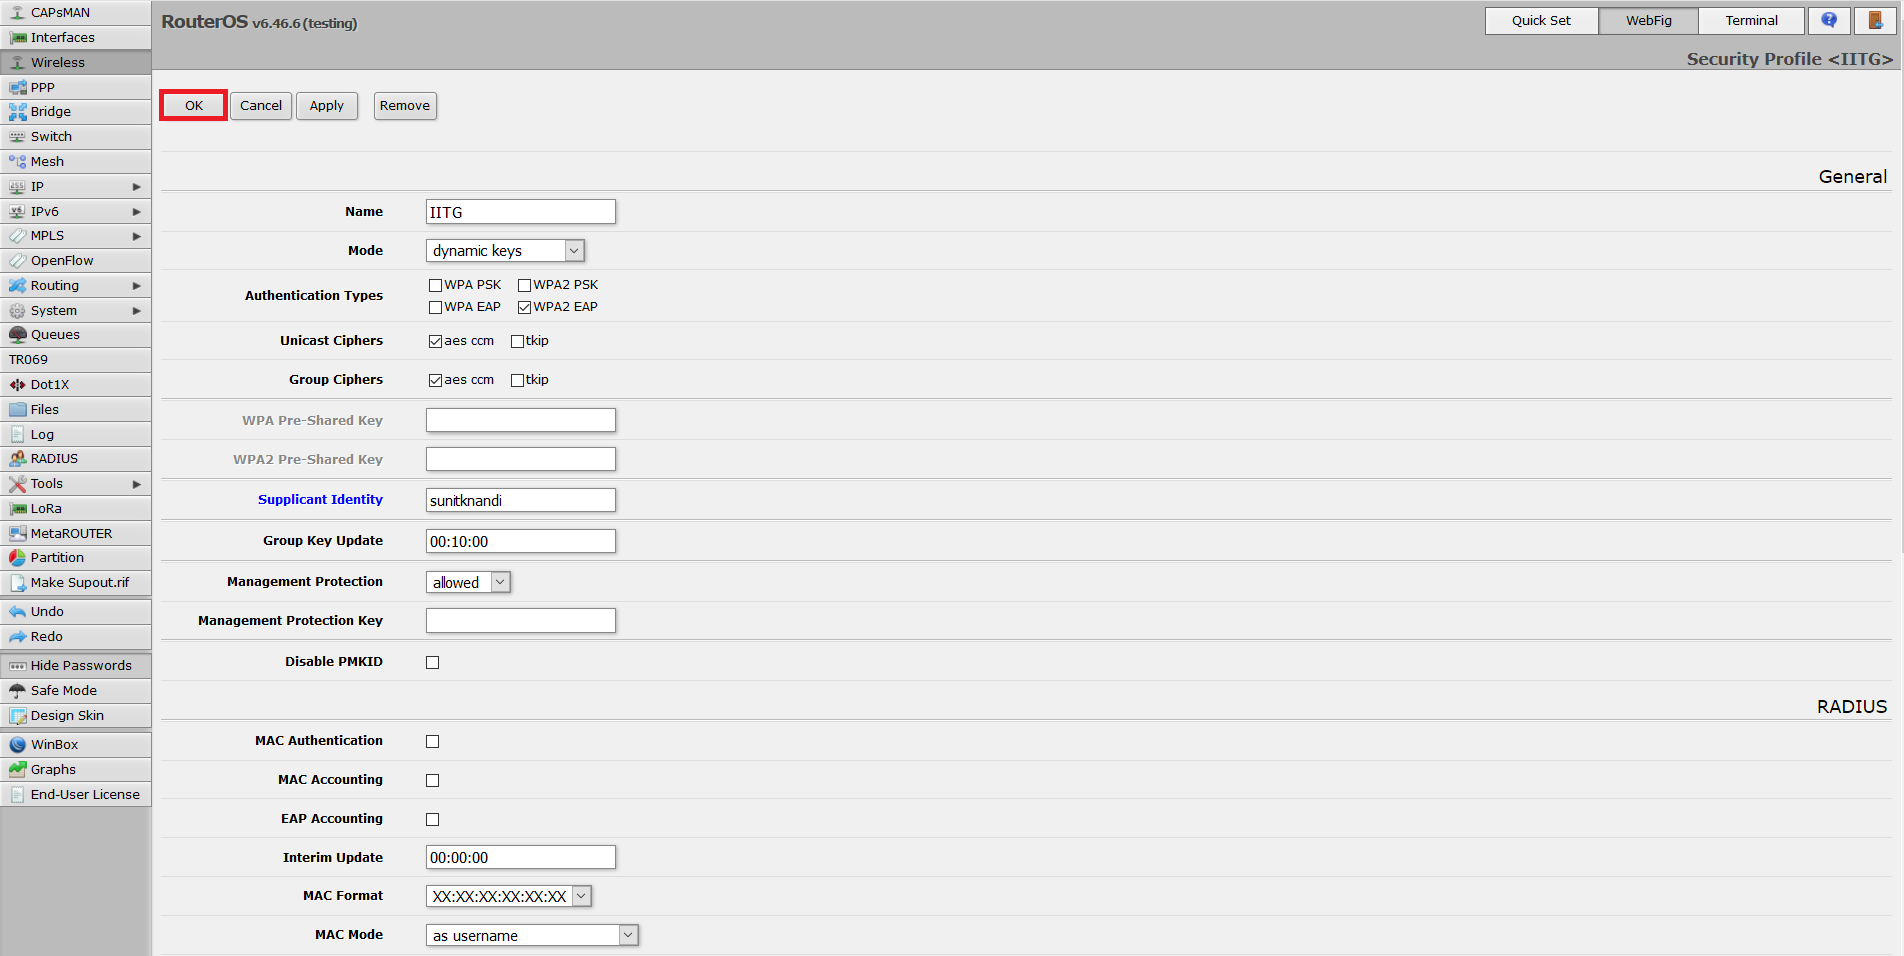
Now, scroll all the way up and click the ‘OK’ button. Your 802.1x security profile is set.
Now click the ‘WiFi interfaces’, choose the interface you wish to use to connect to the upstream WiFi network.

Change ‘Mode’ to ‘station’. The band and channel options will have been set previously during our scan for the network. Now, in the ‘SSID’ field put in the SSID name that was noted earlier. Set the ‘Security Profile’ to the name of the new profile we just created. Then scroll up and click ‘Apply’.
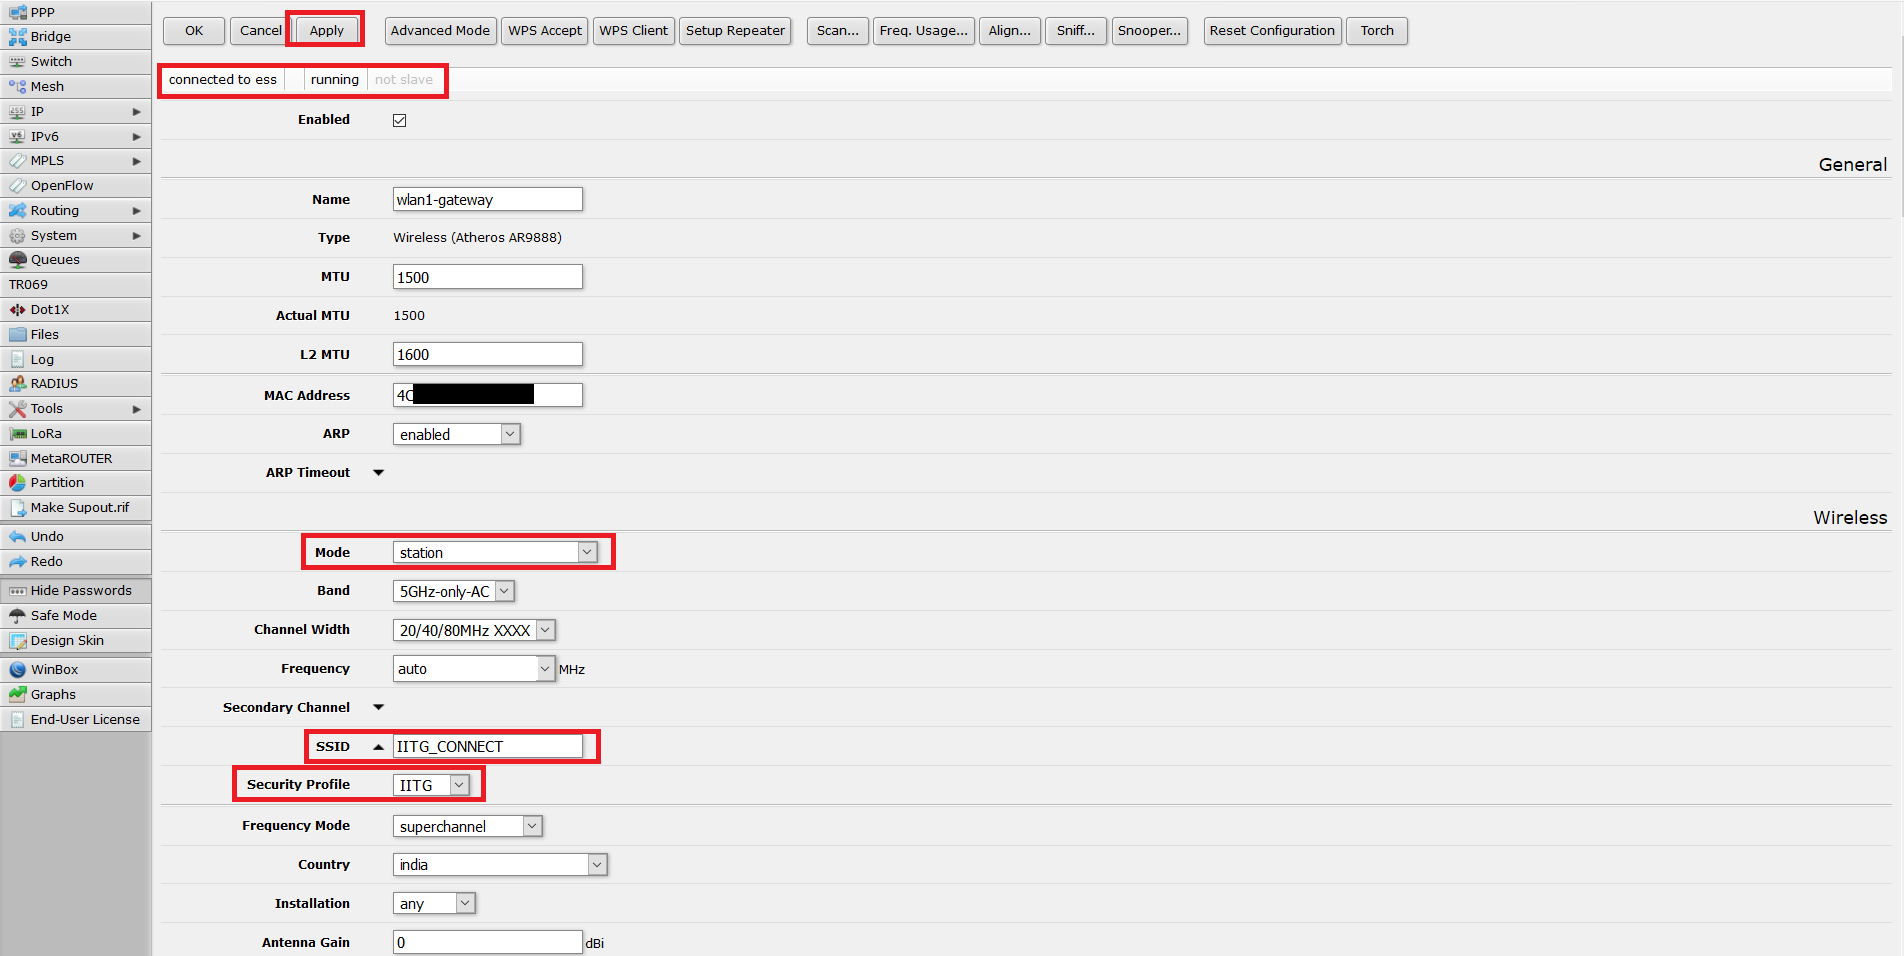
If everything has been done correctly, it should show ‘connected to ess’. And if we scroll all the way down to the ‘Status’ section, it will show detailed connectivity information. Scrolling further down to the ‘Traffic’ section, we will see statistics of traffic going over the wireless link.

Preparing the interfaces (for indoor Mikrotik devices only)
This step is necessary if you are using an indoor home or SOHO equipment like the hAP series. If you have an outdoor equipment that uses the wireless interface as a WAN port, you can simply skip this part.
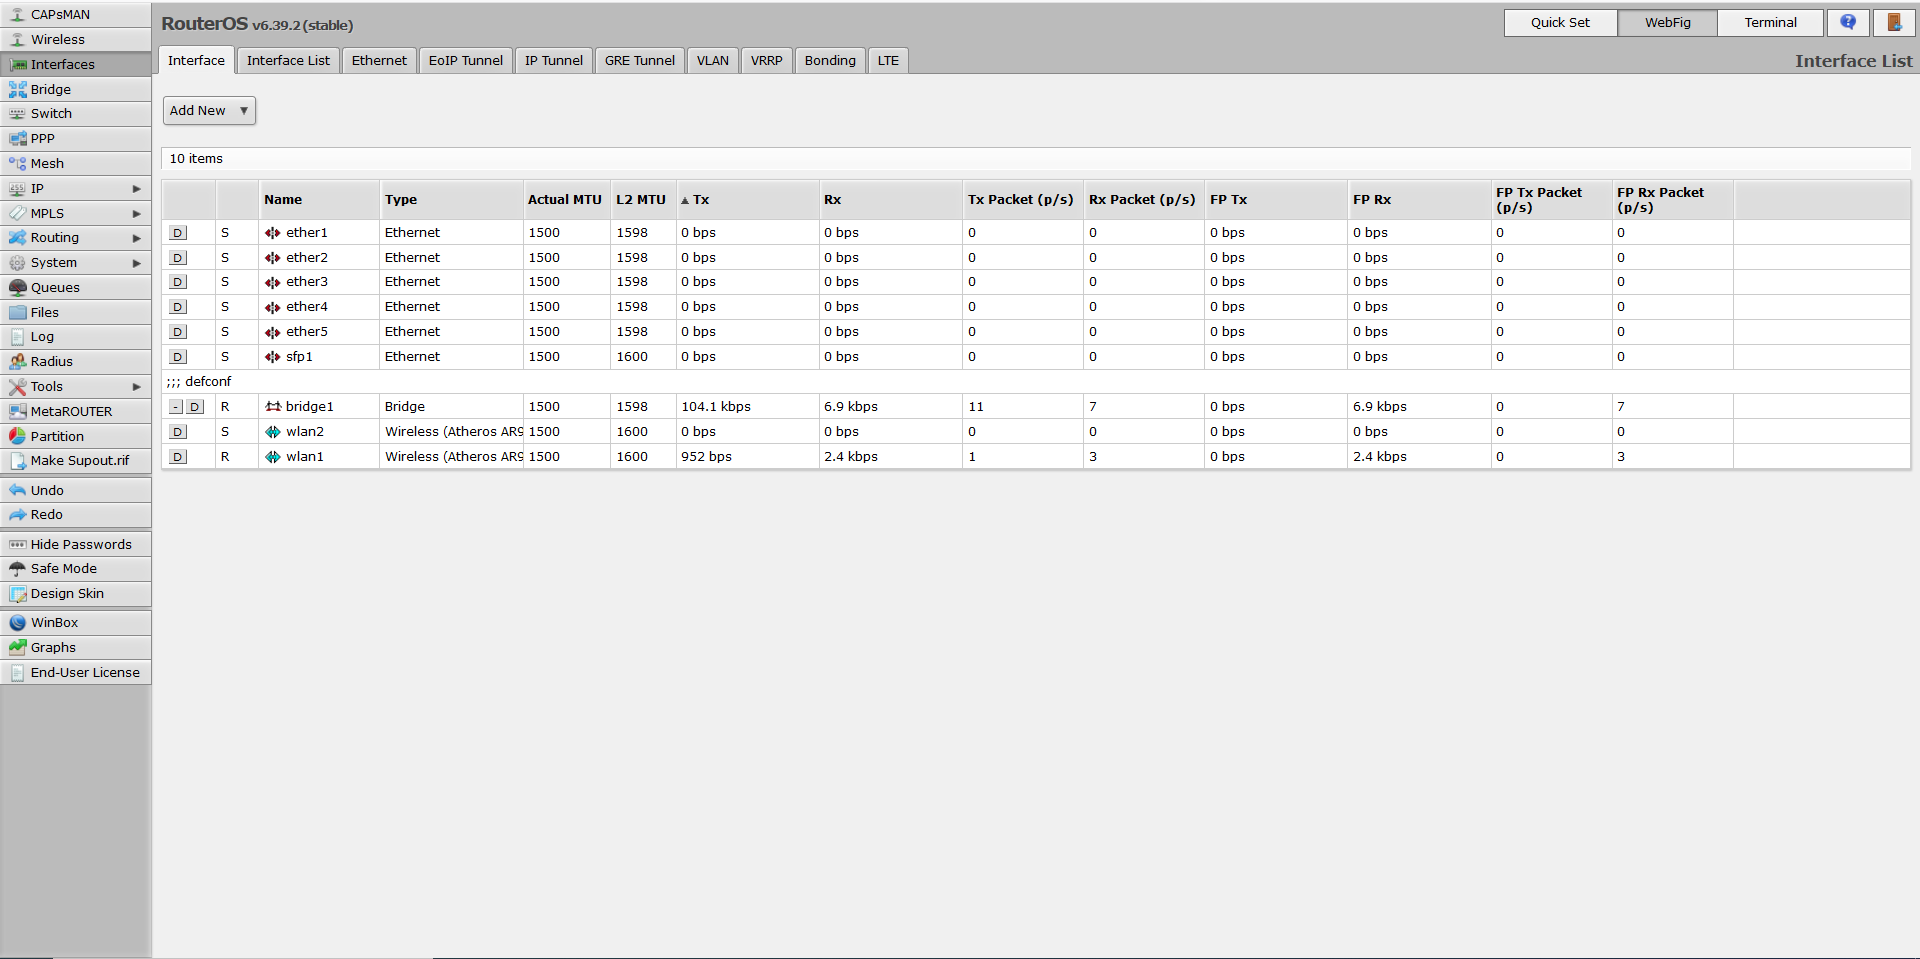
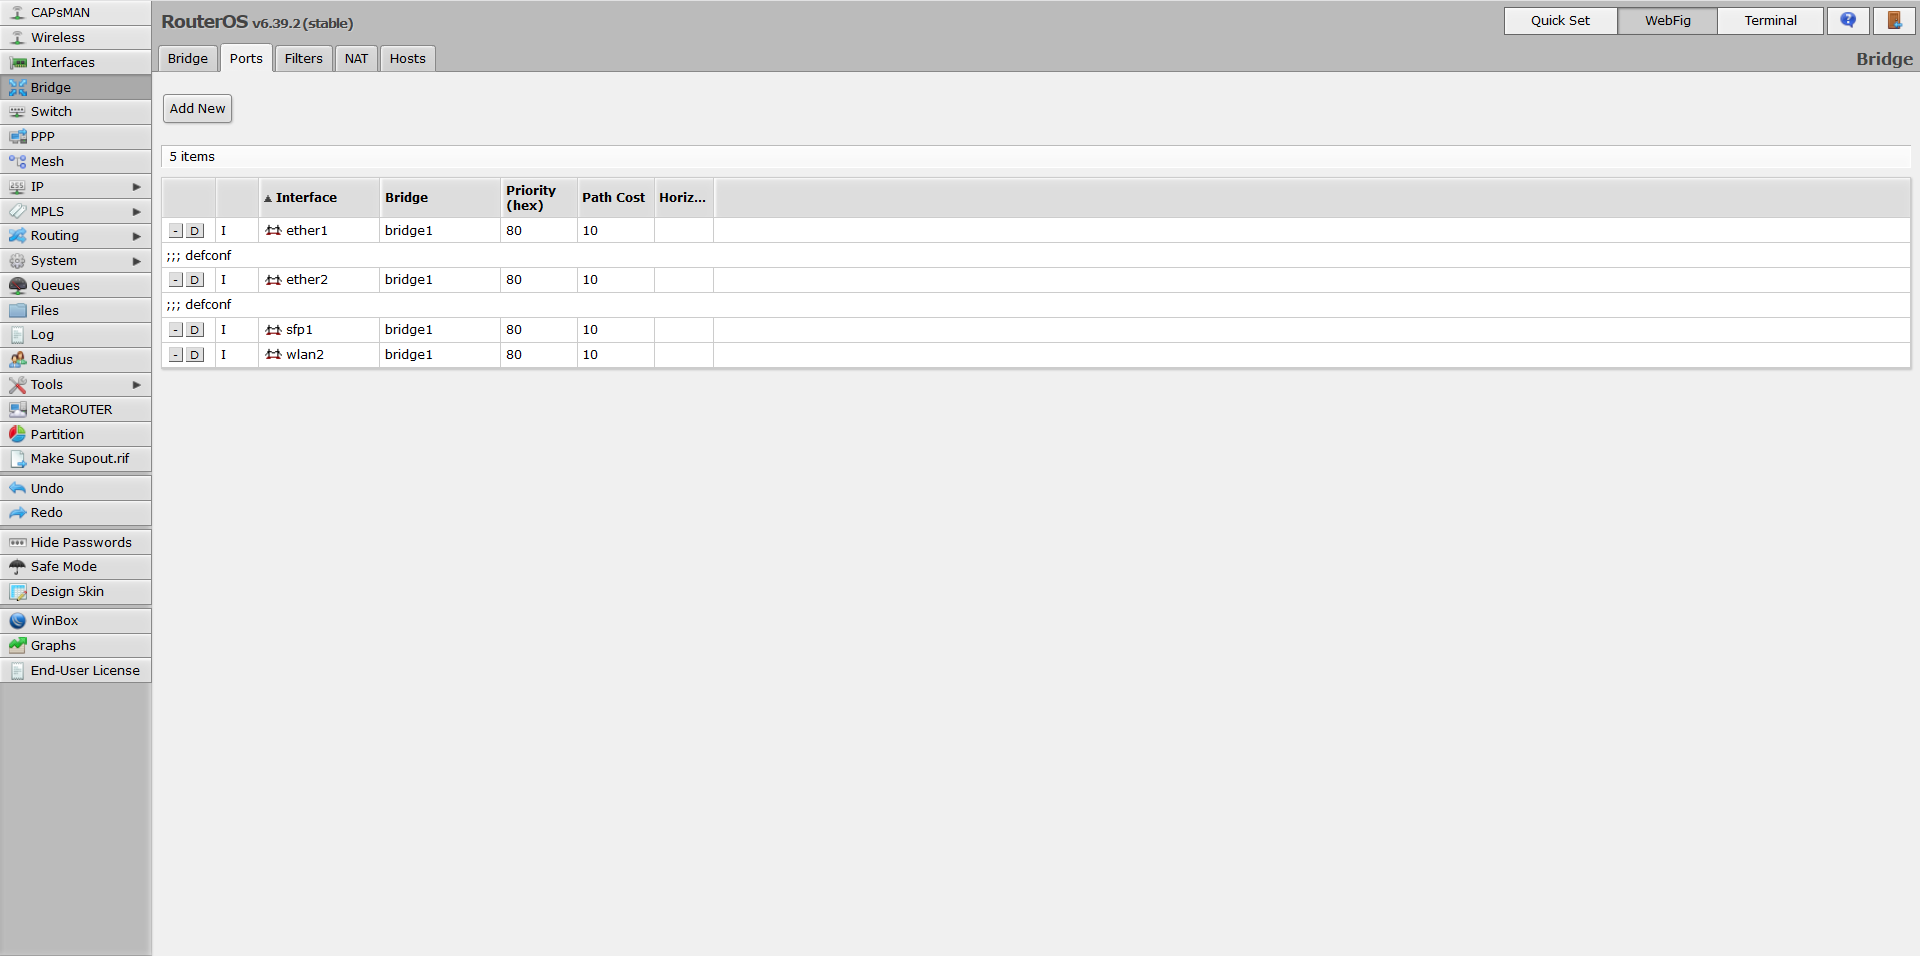
By default, on home and SOHO gateway equipment, the first Ethernet port (named ether1) is added to the WAN interface list. The remaining Ethernet ports (ether2 to ether5) and the WiFi interfaces (wlan1 and wlan2) are connected to the bridge interface (bridge1) and all of them are on the LAN interface list.
What we need to do is put the WiFi interface that connects to the upstream WiFi network on the WAN list. Then assign ether1 as a port in bridge1. Finally put bridge1 in LAN list. The final configuration should look something like this (screenshot has been taken from my hAP ac).

Assigning IP address to the uplink wireless interface and connecting to the Internet
Usually if you are connected to a campus or organization WiFi, the IP address is given out via DHCP. So we want a DHCP client running on the interface that is connected to the upstream WiFi. To do this, go to Winbox or Webfig, click ‘IP’ on the menu bar, then click ‘DHCP Client’. Click ‘Add’.
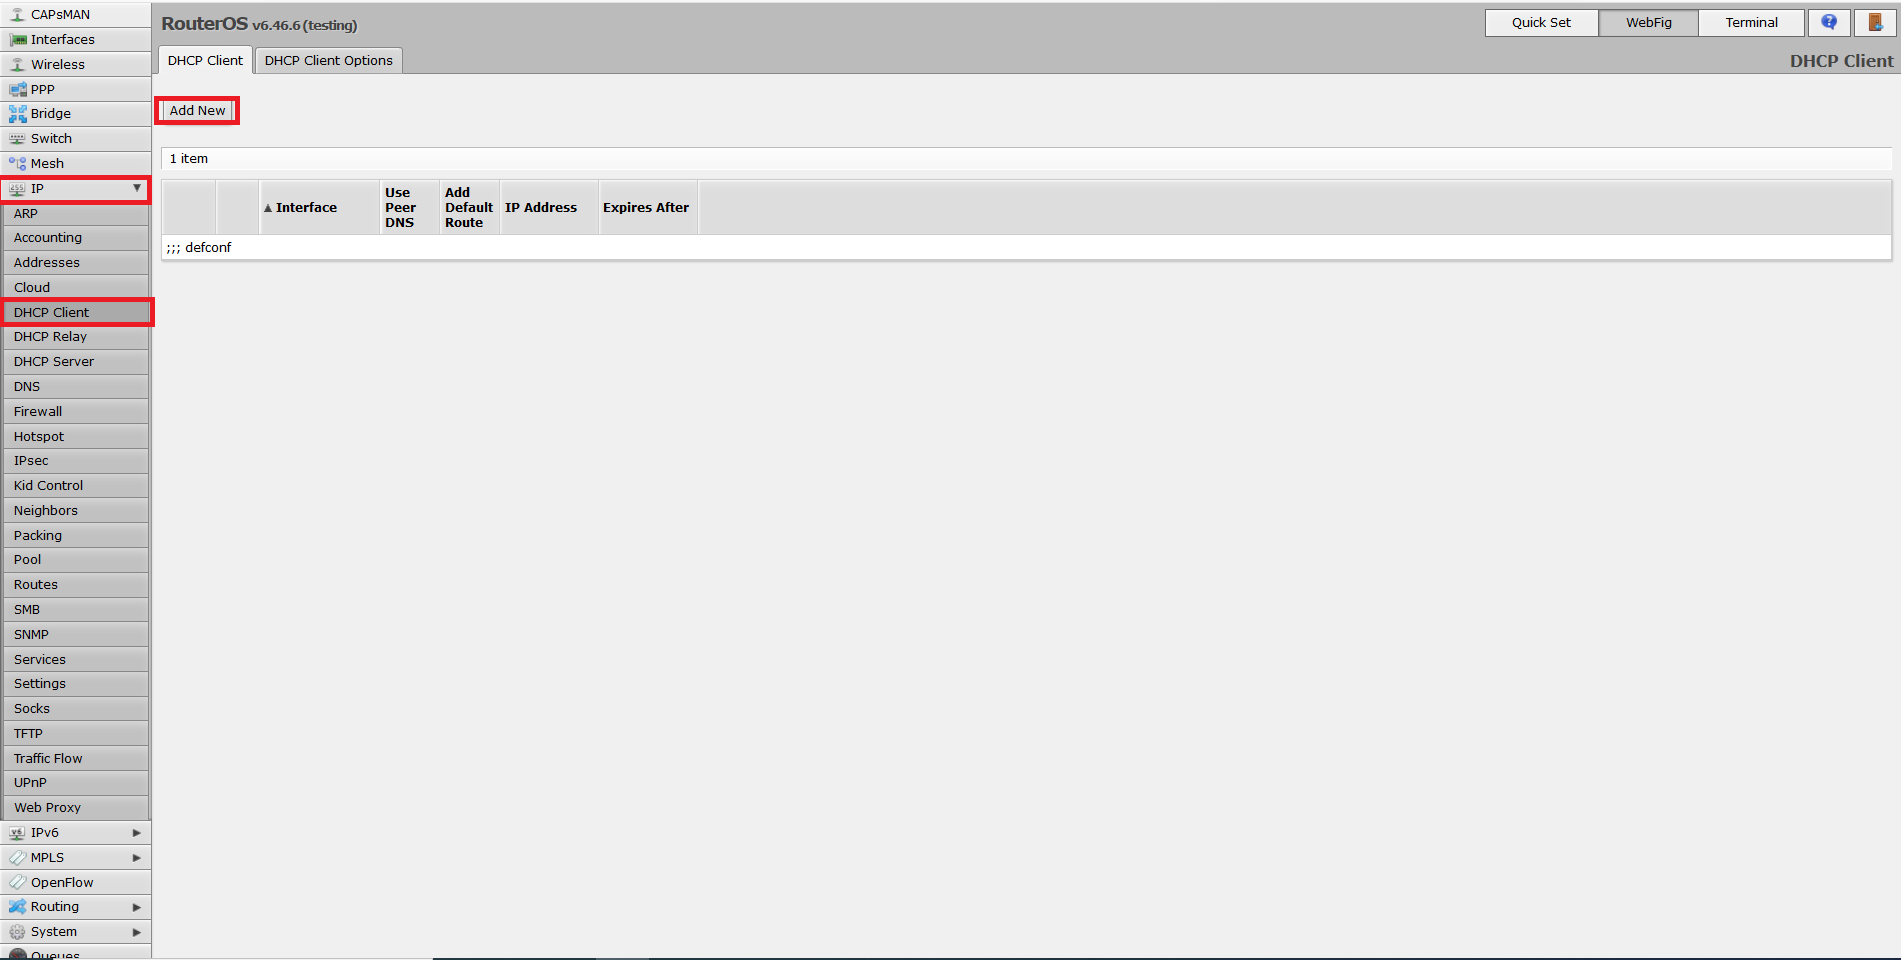
Checkmark ‘Enabled’. Set the interface you are using for the connection (wlan1, wlan2 or wlan1-gateway according to your setup). Set ‘Add Default Route’ to ‘yes’. In ‘DHCP Options‘, click the down arrow to get two dropdown fields. Set the first field to ‘hostname’ and the second to ‘clientid’.
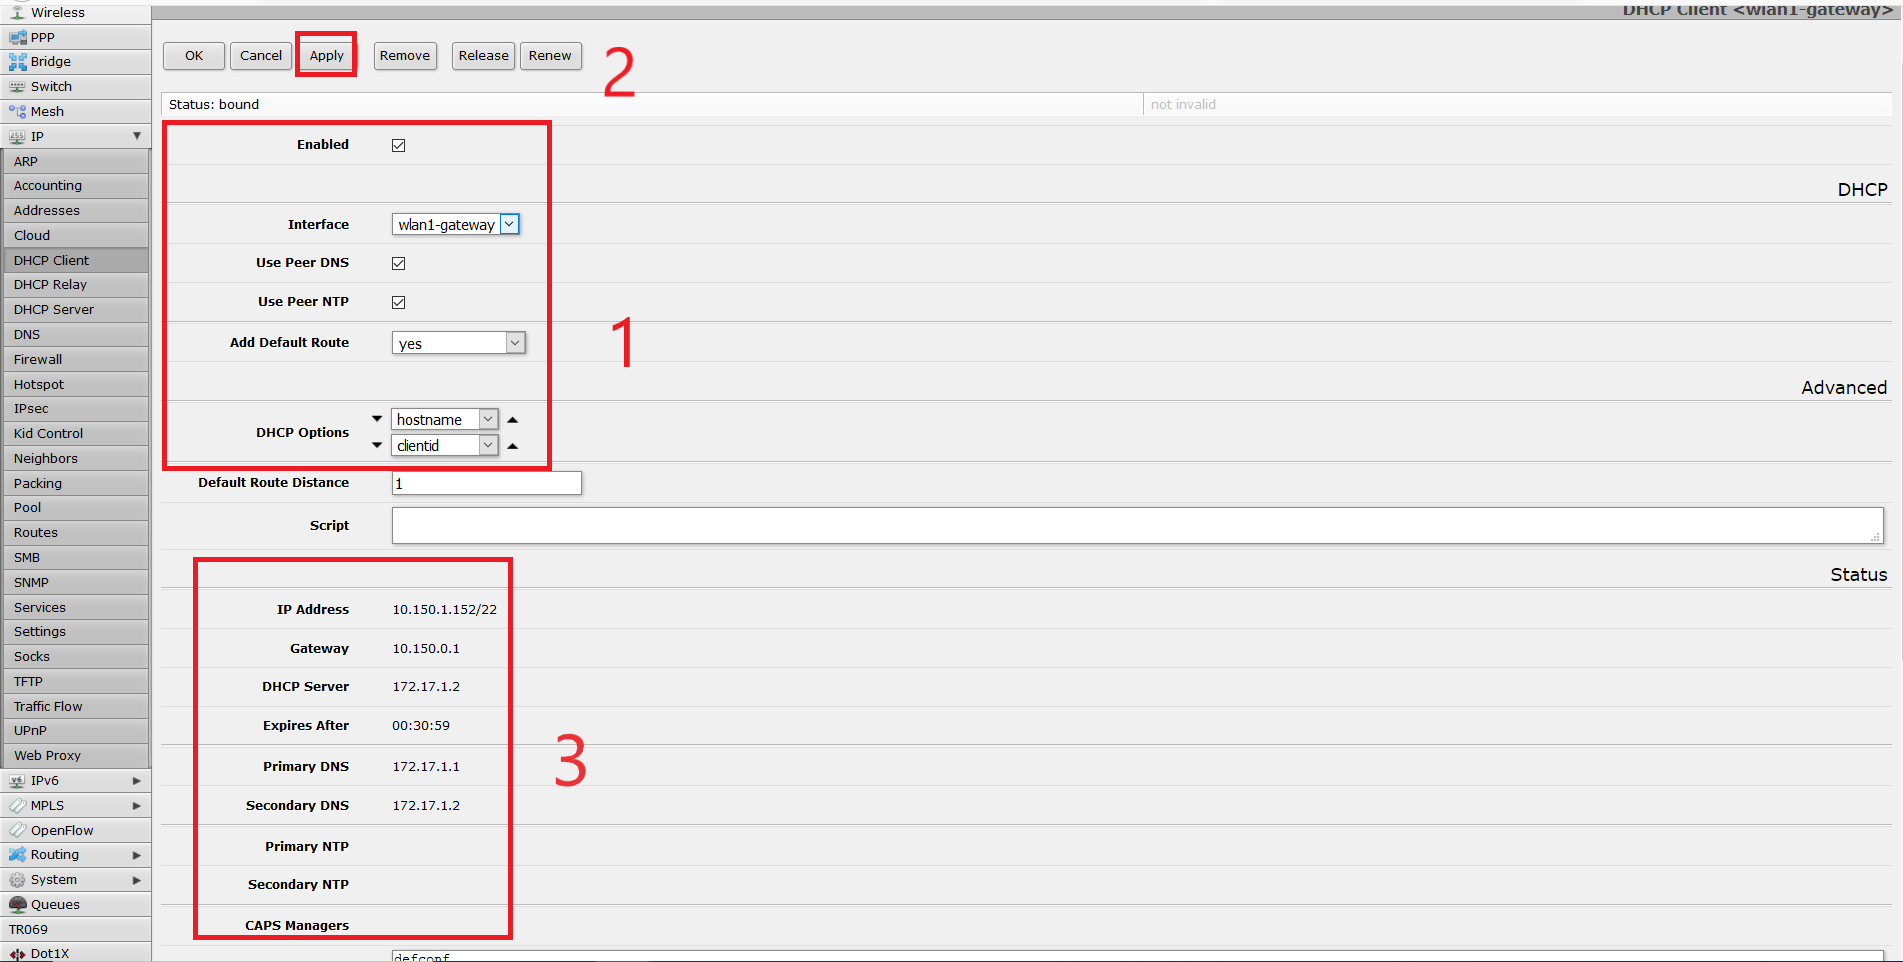
Then click ‘Apply’. In a few seconds, you will see ‘Status: bound’ and the IP address information will show up.
Assuming that you have not modified anything outside this guide, and the local DHCP server is still serving IP addresses in the 192.168.88.0/24 subnet, you will be connected to the campus network in a few more seconds and will be able to browse the web.
Reclaiming the band lost to upstream WiFi (for indoor Mikrotik devices only)
If you have followed the guide so far on an indoor AP-router, you will notice you have lost a whole (2.4 GHz or 5 GHz) band because the radio is being used for the upstream WiFi connection. But what if you have devices you want to connect to your Mikrotik router that are limited to a single band? Or you want to keep dual-band connectivity as advertised by Mikrotik? Well, here is a solution.
RouterOS has a concept of virtual wireless interfaces. Virtual interfaces allow the wireless radio to run in multiple wireless interface modes apart from the default one. People often use this feature for guest networks and separate SSIDs. However, in this case, we will add a virtual interface to restore the local access point feature on the band being used for the upstream connection. Screenshots here have been taken from my hAP ac.
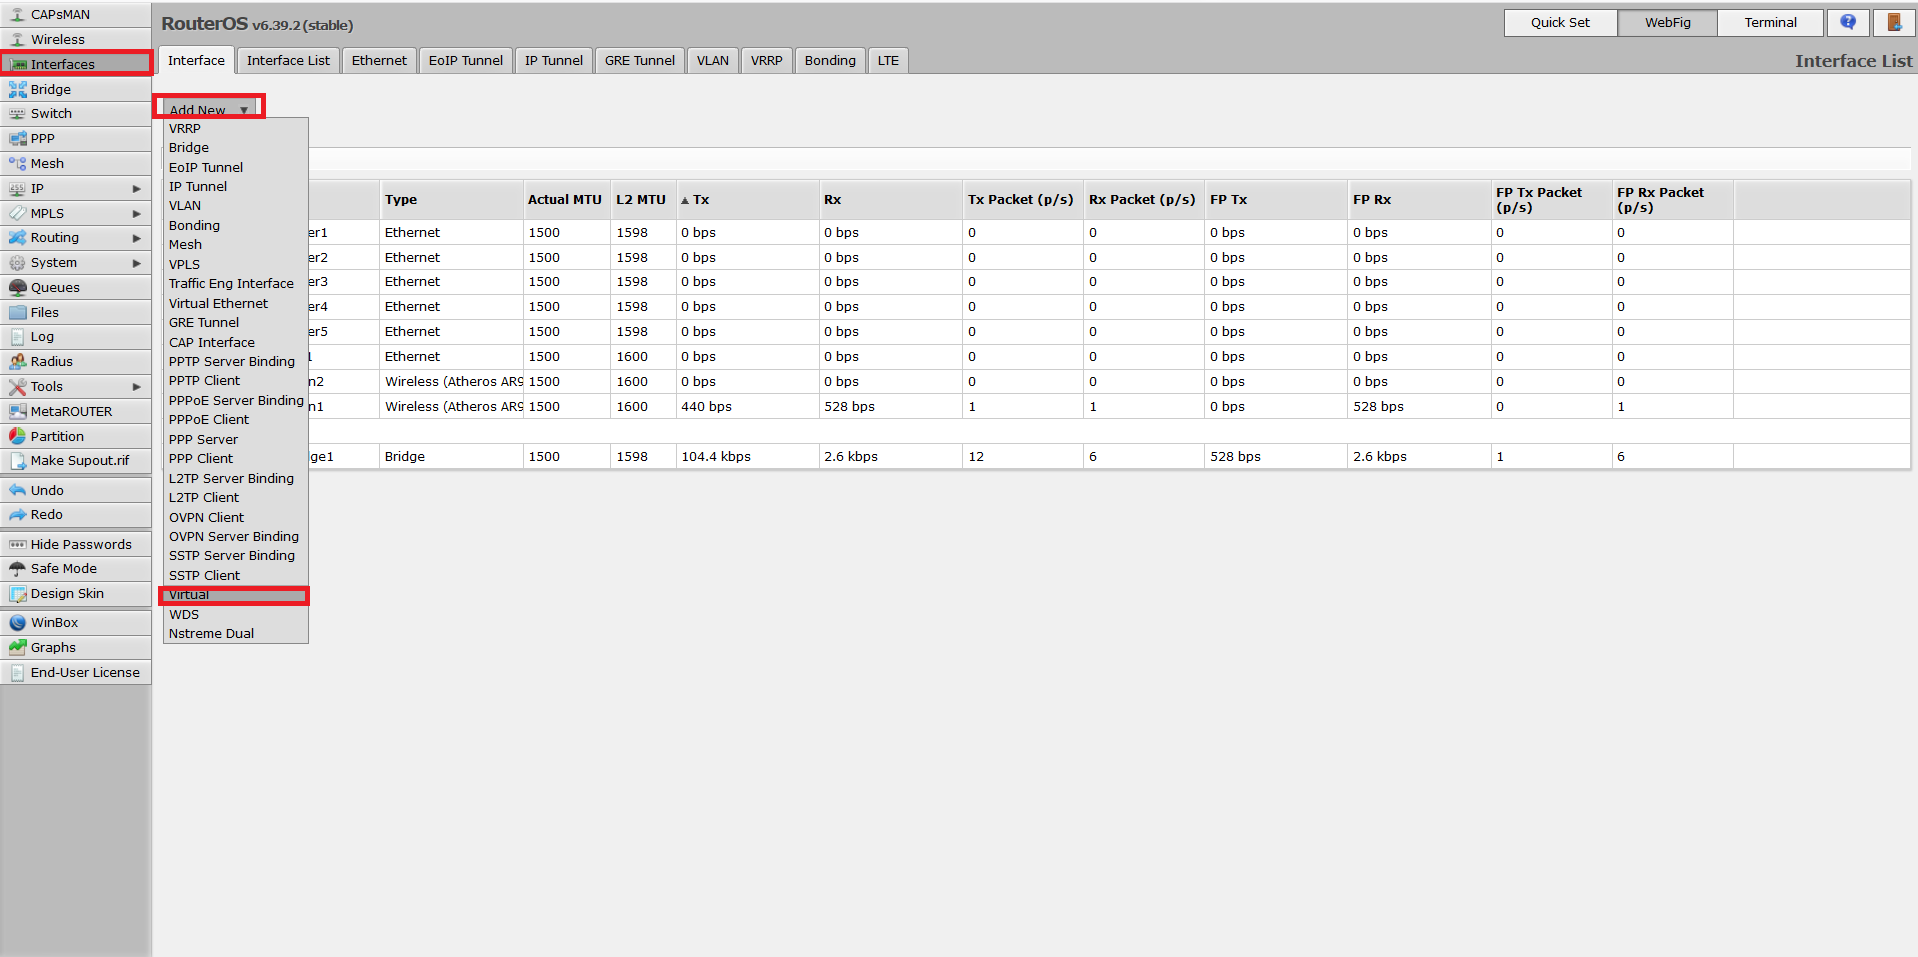
In Webfig or Winbox, go to ‘Interfaces’ in main menu. Then click ‘Add New’. Choose ‘Virtual’.
Give a name to the connection. In my example, it is wlan3. Set the ‘Mode’ to ‘AP Bridge’. Set ‘SSID’ to the name of the local WiFi network. Set the ‘Master Interface’ to the interface being used for upstream connection. Set ‘Security Profile’ to ‘default’ (which is the profile used by the local WiFi network). Finally scroll up and click ‘OK’.

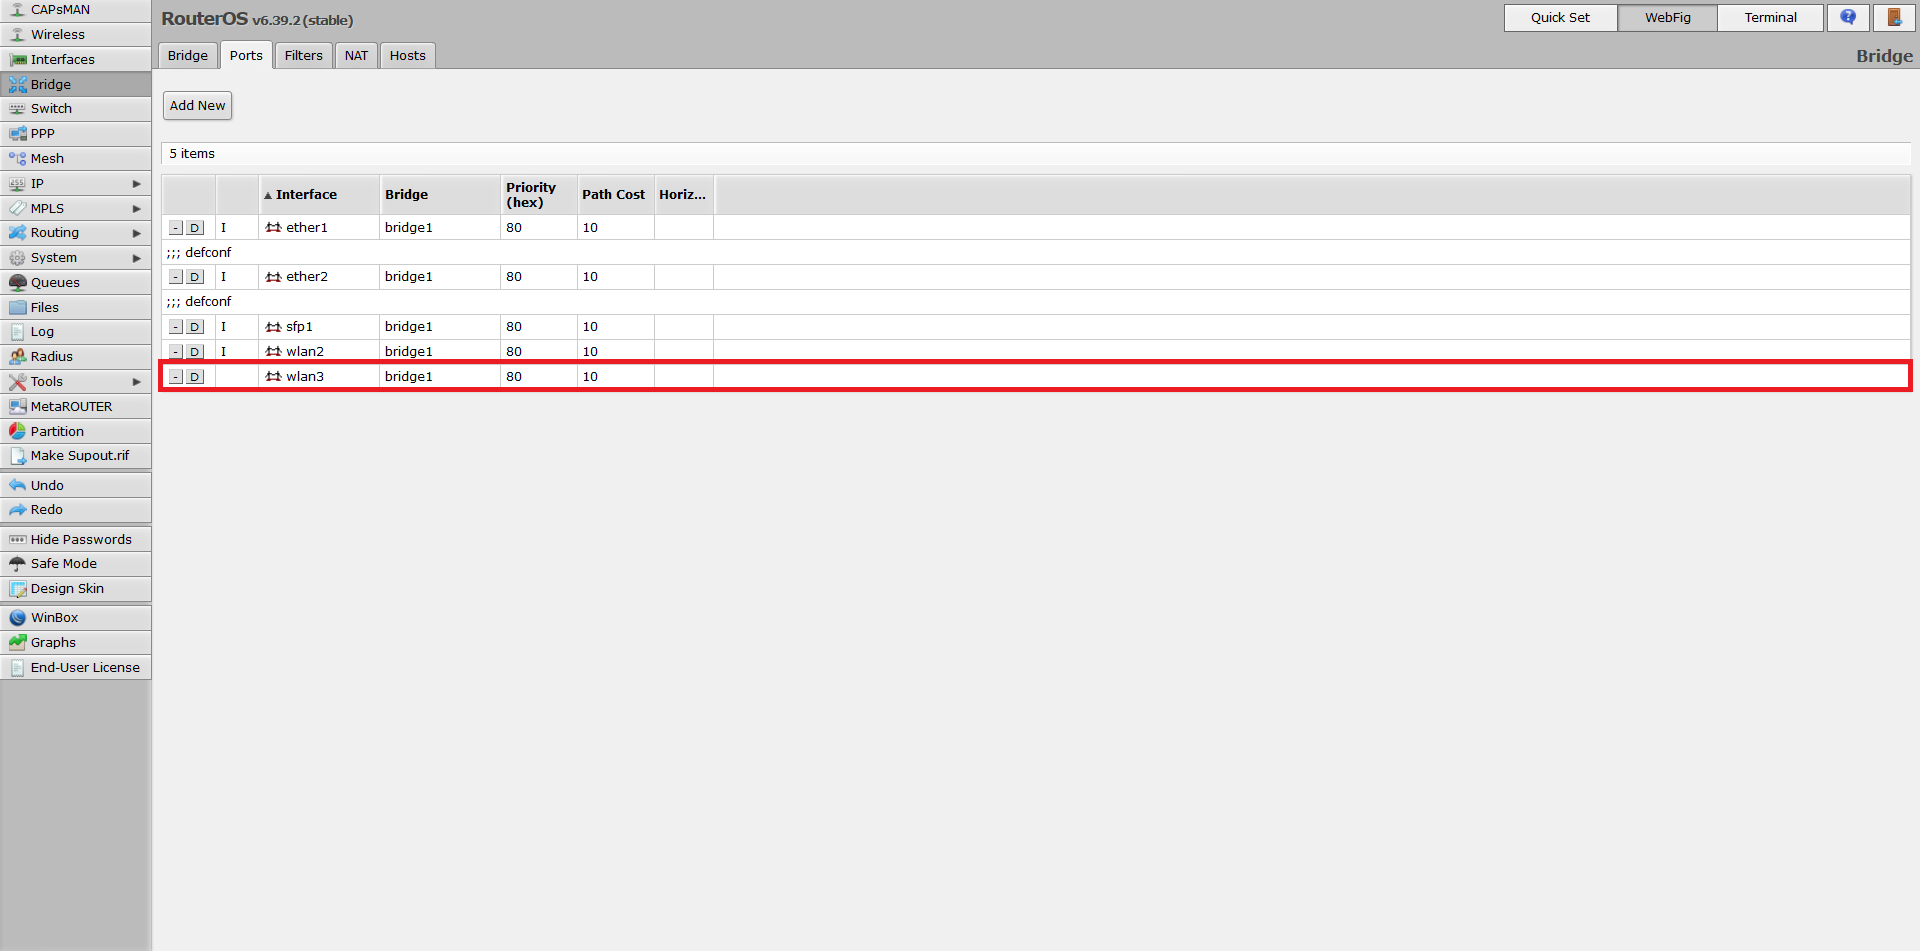
Then add this virtual interface to the bridge interface bridge1.
After a few seconds, your Mikrotik router will be a dual band WiFi router that also connects to the Internet over WiFi. To get optimal performance, make sure to set the frequency bands of the upstream connection and the virtual wireless interface to far apart enough. Otherwise, interference will kill performance for both the upstream and local WiFi links.
This step is not needed for outdoor devices as the local network consists of only a single Ethernet connection.
Final remarks
This article is a guide to quickly extend your personal network connectivity to the WAN and/or Internet using an organization-wide WiFi having 802.1X EAP security.
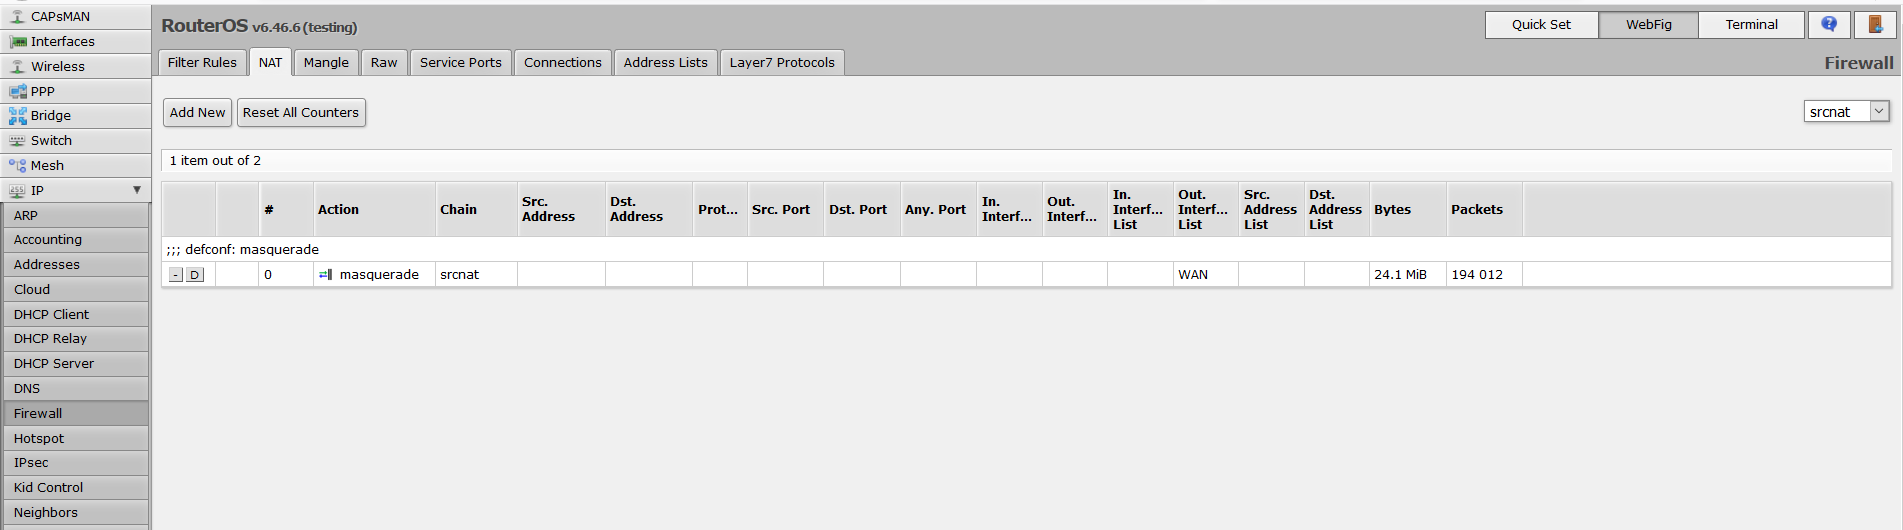
By all means however, this may not be the most optimal setup according to your requirements. Unlike Ethernet and WPA2-PSK based WiFi networks, it is not possible to directly or transparently bridge 802.1X EAP networks without problems. The DHCP server on the organization premises will only provide IP leases to authenticated clients using their MAC address as identifier. This means that only the Mikrotik router can obtain IP address, while bridged clients connected to the Mikrotik router will not get any IP addresses from upstream. We work around this problem in this guide by using 192.168.88.0/24 (the default) as the local network and routing-plus-NATing to the upstream WiFi link (the NATing takes place automatically on the interfaces in WAN list according to default configuration).
You may also need to tweak other settings, like change default firewall rules, change local network subnet including the DHCP server, or may add a wired WAN as a failover, which is outside the scope of this article. You are advised to study the RouterOS documentation to configure according to your own requirement. If you are using an outdoor device to connect to a distant WiFi network, then you need another AP to provide indoor wireless connectivity to your personal network: using the Ethernet cable coming from the outdoor device plugged into the WAN port of the indoor AP.
The possibilities are truly endless!
Have you also done network hacking lately? What do you think of this article? Let us know in the comments below.


i followed the instructions but no luck. It says searching for network. PSK connects fine.
Are you sure you have set the bands correctly? Can you see the network in search?
Thank you Sunit, very well explained document. Mikrotik has great features but poor documentation, and explanations like your are very valuable.
Excellent tutorial, very useful and understandable. It helped me a lot. Thank you very much Sunit
Thank you good man. This is the guide I was looking for. Very good because it is detailed.